How To Archive In Outlook 2010 & Improve Performance
Read the many advantages of how to archive in Microsoft Outlook 2010, or scroll down straight away to start your email archiving process. Note: archiving instructions in this article apply to all versions of Microsoft Outlook, except where stated. The only difference is how to access the auto-archiving settings dialog. Otherwise, the instructions are identical across MS Outlook versions 2003, 2007 and 2010.
Advantages Of Auto Archiving Outlook 2010 Email
Archiving email is a very helpful for any type of account – POP, IMAP, or MAPI. It is best if email archiving in Outlook is set up automatically, instead of remembering to do it periodically. In this guide, we show how to archive in MS Outlook 2010 automatically, so you don’t need to revisit the archiving process again. The archiving process is not mandatory, but it is crucial to maintain optimal speeds in Outlook 2010. The larger your Outlook account, the more it slows down. Many of our email customers find it helpful to archive for very large accounts, and when they have many emails that are months, or years old, that are no longer needed.
It is important to keep in mind that when you archive emails, you are removing them from your email server. Archiving creates a compressed file in your computer’s hard drive. For this reason, it is STRONGLY recommended that you create a back up copy of these emails periodically. They can be burned to a CD, placed on a flash stick, or any type of memory device that can accommodate the size of the file.
How To Auto Archive Outlook 2010 Email
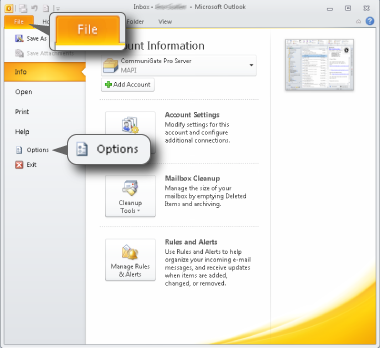
Step 1: Access the Auto-Archiving Settings (specific to Outlook 2010). Select the File tab from the main menu bar and click Options.
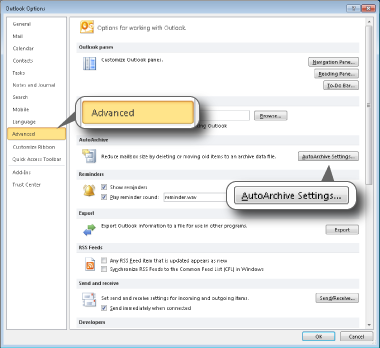
Step 2: Select the Advanced tab from the left column. Then click the button AutoArchive Settings… (the 5th button from the top, on the right side).
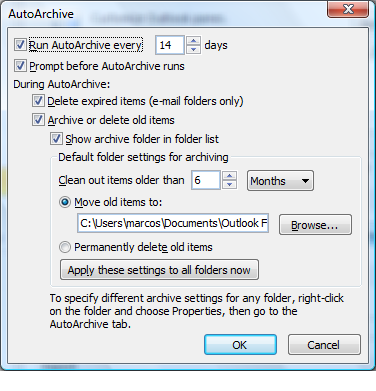
Step 3: Applying the Auto-Archiving Settings.
Run Auto Archive every (x) days: This is where you tell Auto Archiving how often to run. Our example shows every 14 days. Choose whatever value is most appropriate for the size of your email account.
Prompt before Auto Archive runs: This feature is useful because it gives you the option to cancel this particular Auto Archiving process.
Delete Expired Items: This feature only applies to emails that are defined to expire on a specific date. See the end of this article for an explanation of the difference between expired and older emails.
Archive or delete old items: If this check box is selected, then emails older than the time specified in Clean out items older than will be archived or deleted.
More Outlook 2010 Archiving Options
The remaining options are useful. You can choose to permanently delete older Outlook emails or add them to the archive on your hard disk. Once an email is deleted, it is removed from both the server and your local machine, and can not be read again. However, if an email is archived, it is still accessible through the archive folder.
Show archive folder in folder list: Be sure to place a check / tick next to this option in order to be able to access your archived emails easily.
Permanently delete old items: Selecting this option will permanently remove your older emails from both the server and your local hard drive.
Move old items to: Selecting this option will archive your emails locally on your hard drive. You can use the default archiving folder, or press the Browse button to choose another location.
What Is The difference Between ‘Expired’ & ‘Older’ emails?
An expired email is an email that specified a date expiry time when it was created or sent. This might be useful for emails sent concerning a discount or offer that is only valid for a limited time. An older email is an sent past the number of days specified in the setting ‘Clean out items older than’.
How To Automatically Archive Outlook 2010 Emails & More FAQs: Answering Your Most Immediate Questions Now
How To Recover Deleted Email in Microsoft Outlook 2010
To recover deleted emails in Outlook 2010, select the folder, then click on the Folder tab on the Ribbon and click Recover Deleted Items. You’ll then have the option to select the emails or email folder you want to recover. When you have selected the emails, click the Recover icon. Keep in mind that if you are viewing non-mail folders, the Recover Deleted Items icon won’t be visible. To enable it, follow these steps:
- Click File > Options in the file menu on the Ribbon tab.
- Choose the Customize Ribbon option.
- Make sure you’re in the Customize the Ribbon list and then select the Folder main tab.
- Click the New Group button.
- In the Choose commands menu, select All Commands.
- Scroll down and press the Recover Deleted Items option.
- Click the Add >> button to add this option to your newly created custom group.
- Hit the OK button. Your new group, along with the Recover Deleted Items icon, will be visible in the Folder tab on all folders.
How To Backup Outlook 2010 Emails
You can backup your Outlook 2010 emails in a .PST file, which is an Outlook Data File that contains all your messages and other Outlook items. To create a backup of your emails, follow these steps:
- Click on the File tab in the Outlook client.
- Choose Options > Advanced.
- In the Export section, click the Export button.
- Select the option Export to a file > Next.
- Choose Outlook Data File (.PST) > Next.
- Select the email account you want to export and check the box next to Include subfolders.
- Select where you want to save the Outlook Data File (.PST).
- Enter a file name for your backup and click OK.
- Press the Finish button.
Once the export process is complete, you’ll have a portable .PST file that you can save to OneDrive, a portable USB, or the cloud. You can use that file to import your email, contacts, and calendar items to Outlook.
How To Backup Contacts in Outlook 2010
Besides emails, Outlook 2010 makes it easy to backup your contacts folder. Here’s how to do it:
- Click the File tab.
- Select Options.
- Select Advanced > Export.
- Select the Export to a File option and then click Next.
- Choose Comma Separated Values (Windows) to create a CSV file.
- On the next screen, under the Select folder to export from: choose the Contacts folder you want to export.
- Click Next.
- Select the location where you want to save it.
- Enter the name for the backup file and hit OK.
- Click the Next button and then click Finish.
You can then use the exported file to import your contacts into Outlook or another email program.
Need further assistance setting up Microsoft Outlook email?
Well, there you have it. Email archiving in Microsoft Outlook 2010, plus some other tips to improve the organization and efficiency of Outlook email. We hope you now have a more organized inbox and performance has improved. If you’re an existing Fastmetrics email customer and have more questions about email support, see how to setup a remote support session with one of our email techs using Logmein123.com.
About Fastmetrics, Inc. Building & Business ISP
Since 2002, Fastmetrics is the Bay Area's only dedicated business ISP. We provide telecommunication services in California and the San Francisco Bay Area. Reliable service - backed by better live and local support. From install to 24-7 proactive monitoring, get treated like a VIP customer. Not a number by a faceless call center. We specialize in managed business internet and phones, dedicated high speed business fiber internet, business WiFi, SIP voice solutions / UCaaS and managed network services. We are a Microsoft and Cisco Meraki Partner. Our team are Certified Cisco Specialists, Ubiquiti Enterprise Wireless Accredited and Polycom Authorized Solution Advisors. We take care of your business network, so you can focus on growth.