Step 1: locate the calender icon at the bottom of your desktop.

Step 2: click on the calender icon.

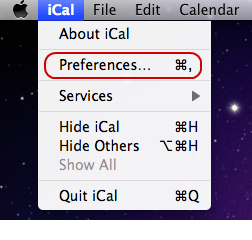
Step 3: select Preferences from the iCal menu.
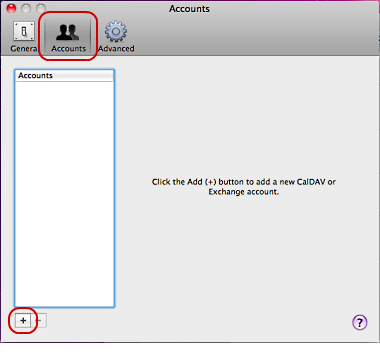
Step 4: on the accounts window select the Accounts tab. Then click in the plus symbol located at the bottom left to add a new account.
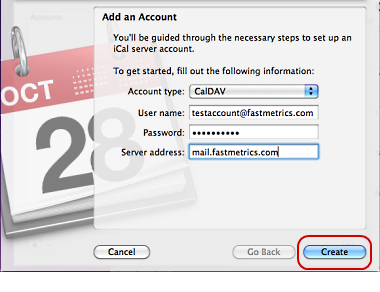
Step 5: select CalDAV. For User Name enter full email address. Enter your email Password. The Server Address must be mail.fastmetrics.com. Then click Create.
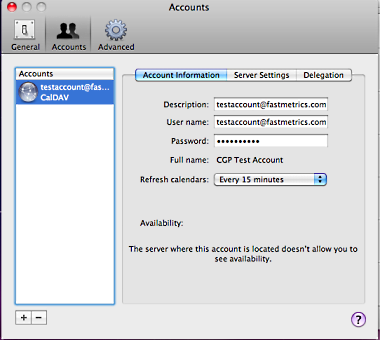
Step 6: your account is now set up. You may close the accounts window.
What Is a CalDAV Account?
CalDAV is a protocol for sharing calendars that was proposed by Apple. Similar to the CardDAV protocol, CalDAV makes use of the WebDAV protocol to share calendar data in the iCalendar format.
This protocol allows multiple devices and apps to access your calendar data, simplifies cooperative planning, and gives you greater control over data sharing settings.
The CalDAV protocol relies on the internet to work and requires data to be stored on a central server. Thanks to this, apps and devices can connect to the server independently and synchronize data.
How Do I Sync the Calendar With My Mac Using CalDAV?
To sync your calendar with your computer running a MacOS or other Apple device, you’ll need to add your account type to your Mac calendar following the steps we outlined earlier.
By default, the calendar will sync with your Mac every 15 minutes, but if you’d like to change the frequency, follow the steps below:
- Launch your Apple Calendar.
- In the top toolbar, click Calendar > Preferences.
- Click on the Accounts tab.
- In the accounts pane on the left, click on the account you want to synchronize.
- Under Account Information, locate Refresh settings.
- Choose the Refresh frequency from the dropdown menu or choose Manually to manually perform a CalDAV sync of your calendar data.
How Do I Set Up a CalDAV Account Password?
So, how do you create a CalDAV account password? We can guide you.
Your CalDAV password is the same password for the account whose calendar is being synced to your Mac computer. You can get this information from your calendar provider or your IT department.
What Is My CalDAV Server Information?
To configure your CalDAV account on your Mac, you’ll need your server address, email address, and email password. The server address must be mail.fastmetrics.com. If you have trouble with your email administrator or your password, contact your IT department for help obtaining it.
How Do I Create a CalDAV Account?
Your CalDAV account will be created for you by your IT department, and it will use the same email address and password as your company email account. You’ll then need to set it up on your Mac by launching your built-in Calendar app and following the previously described steps.
How Do I Synchronize and Set Up a CalDAV Account on Mac Outlook?
Currently, Outlook for Mac doesn’t support the CalDAV or the CardDAV protocol. Therefore, you will need to use the built-in Calendar application to sync and set up a CalDAV account on Mac.
However, you can sync an iCal server with Outlook for Mac. You’ll need to subscribe to the iCloud calendar and add it to Outlook Web Access. Once you’ve done that, it will instantly act as a CalDAV synchronizer with Outlook for Mac. Here’s how:
- First, log in to your iCloud account using your preferred browser.
- Go to the Calendar section and tap the Share icon next to the calendar you want to sync with Outlook.
- Tick the box next to Public Calendar and then Copy the generated link.
- Open a new tab in your browser and go to Outlook Web Access.
- Click on the Calendar icon in the navigation pane on the left.
- Click Add Calendar and then tap From Internet.
- Paste the link you copied from iCloud. Enter a name for your CalDAV Calendar and choose whether the calendar will be added to My Calendars or Other Calendars.
- When you’re done, click the Import button. The calendar will then be visible in your Calendars list, and it will show up in the calendar section in Outlook for Mac.
About Fastmetrics, Inc. Building & Business ISP
Since 2002, Fastmetrics is the Bay Area's only dedicated business ISP. We provide telecommunication services in California and the San Francisco Bay Area. Reliable service - backed by better live and local support. From install to 24-7 proactive monitoring, get treated like a VIP customer. Not a number by a faceless call center. We specialize in managed business internet and phones, dedicated high speed business fiber internet, business WiFi, SIP voice solutions / UCaaS and managed network services. We are a Microsoft and Cisco Meraki Partner. Our team are Certified Cisco Specialists, Ubiquiti Enterprise Wireless Accredited and Polycom Authorized Solution Advisors. We take care of your business network, so you can focus on growth.