Polycom SoundPoint IP 430 Phone User Guide & Support Manual
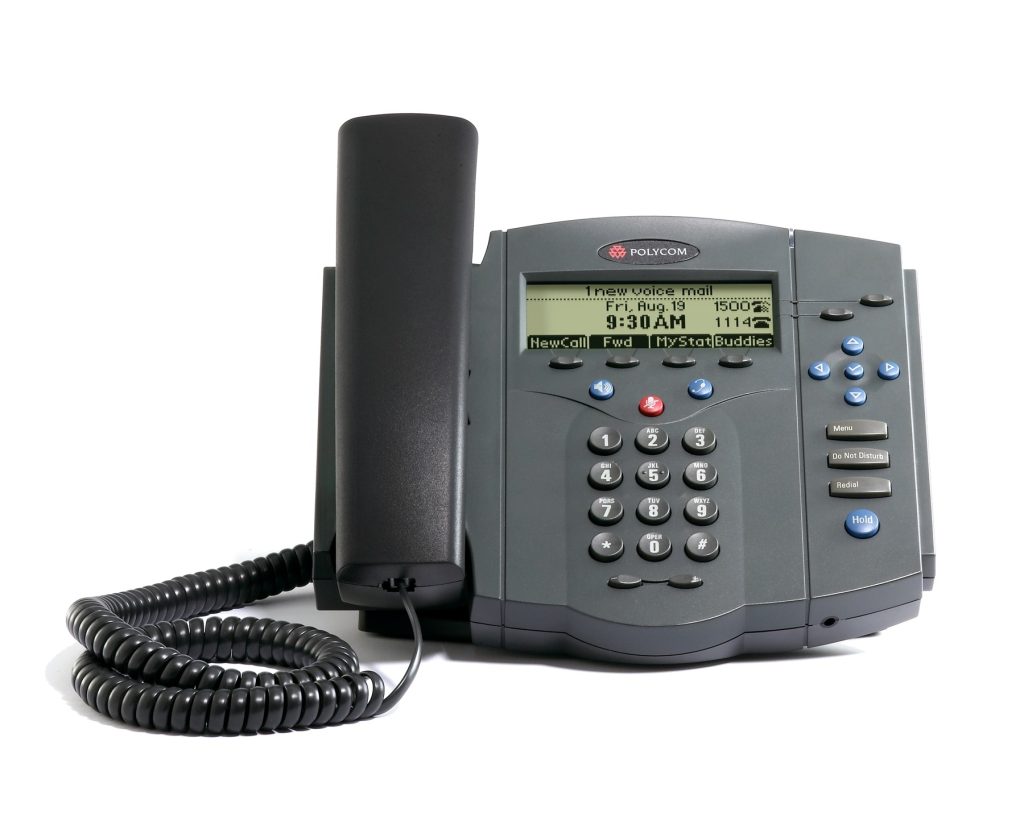
By choosing the Polycom SoundPoint IP 430 phone, you now have a full-duplex, hands-free desk phone. The Polycom SoundPoint 430 phone provides business telephony features and functions such as multiple call appearance, call hold, transfer, and conferencing over an IP network.
In this Polycom SoundPoint IP 430 phone user guide, you will find everything you need to quickly use your new 430 IP phone. Before getting started, be sure to verify with your System Administrator that your network is prepared for configuring your Polycom IP 430 phone. See how easy it is to manage cloud phone service features with your Polycom 430 phones.
Polycom 430 Phone Setup
- Polycom 430 – Parts List
- Polycom 430 Connecting Network & Power
- Polycom 430 Connect Handset and Headset
- Polycom 430 Attaching the Base
- SoundPoint 430 Basics Video
Polycom 430 Phone Layout and Keys
Using Your Polycom 430
- Polycom 430 – Place a Call
- Polycom 430 Answer a Call
- Polycom 430 End a Call
- Polycom 430 Call Timer
- Polycom 430 Call Forwarding
- Polycom 430 Transfer a Call
- Polycom 430 Conferencing
- Polycom 430 Redial
- Polycom 430 Voicemail
- Polycom 430 Contact Directory
- Polycom 430 Call Lists
- Polycom 430 Buddy Lists and Block Contacts
- Polycom 430 Speed Dial
- Polycom 430 Shared Lines
- Polycom 430 Multiple Call Appearances
- Polycom 430 Multiple Lines
- Polycom 430 Multiple Keys Per Line
- Polycom 430 Troubleshooting
Polycom 430 – Parts List
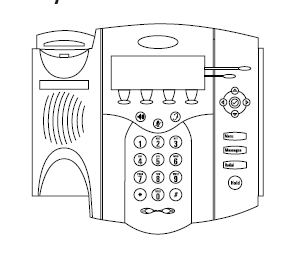
The following items are included in your SoundPoint® IP 430 SIP package. Check this list before installation to ensure that you have received each item. If you are missing any items, please contact your system administrator.
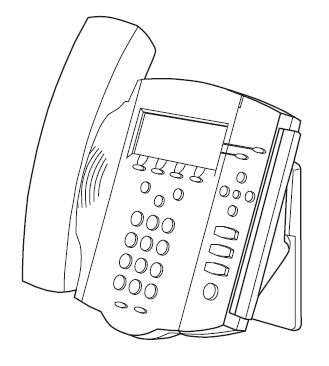
Polycom SoundPoint® IP 430 SIP
Handset & Handset Cord
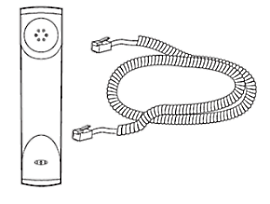
Network Cable

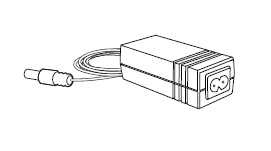
Power Adapter (Not shown: Country-specific AC cord provided)
Phone Base
Quick Start Guide

Polycom 430 Connecting Network & Power
AC Power Option.
Connect the supplied Network cable between the LAN jack on the phone and the LAN port on the wall or hub/switch device port.
Connect the DC plug on the power adapter to the DC 24V jack marked on the phone. Connect the country-specific AC cord to the power adapter.
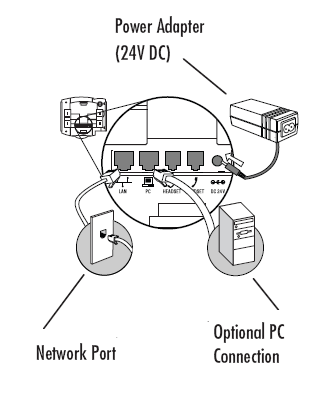
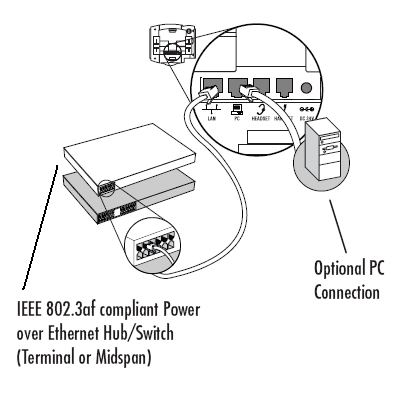
In-Line Power Option.
If the phone is connected to a compatible Ethernet switch that can provide in-line power, the phone will use that power option. Simply plug the supplied Network cable between the LAN jack on the phone and an available Power and Data port on the In-Line Power switch.
Need reliable internet service to support your IP phones?
Fastmetrics provides a range of managed and reliable internet service connections, to support and power your Polycom SoundPoint 430 or IP phones.
- Our team has more than two decades experience providing managed phone services to businesses of all sizes.
- All Fastmetrics phone lines are provisioned over our private cloud voice network, for superior levels of Quality of Service (QoS).
- Wide range of advanced business features included. No extra costs. Plus, seamless mobile presence via the free Fastmetrics Cloud Phone app.
- Your choice of the latest Polycom VVX 310 or Yealink T42G handsets for FREE, for every phone user at your company.
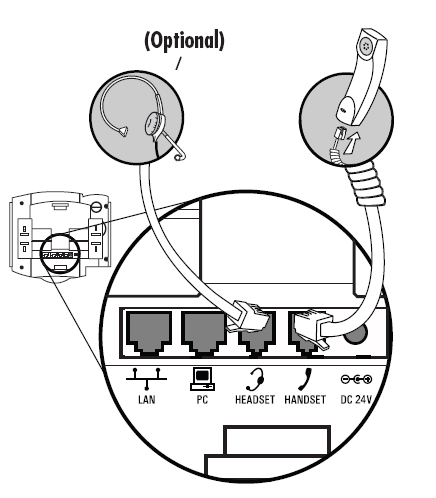
Polycom 430 Connect Handset and Headset
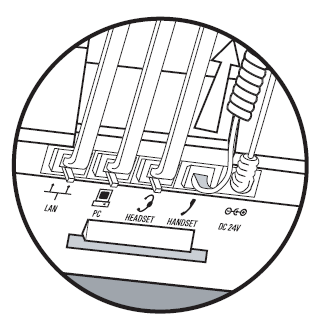
Connect the short, straight end of the phone cord to the handset and the corresponding longer straight end of the cord to the handset jack on the back of the phone. Connect the headset (optional accessory) to the headset jack on the back of the phone.
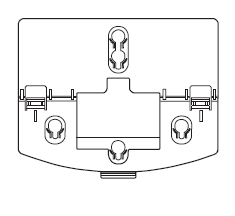
Polycom 430 Attaching the Base
The base unit can be attached to the SoundPoint IP 430 in one of two ways:
- Deskmount Method.
- Wallmount Method.
Deskmount Method
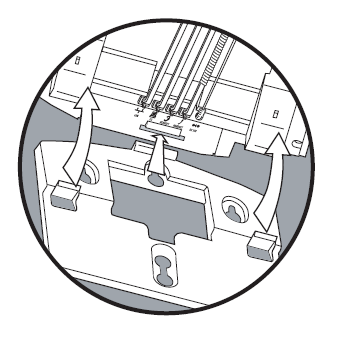
Step 1: place all cords in the recessed area above the modular jacks as shown.
Step 2: align the two protrusions on the bracket with their corresponding holes in the phone and snap them together to lock the base to the phone.
Wallmount Method
Step 1: place all cords in the recessed area above the modular jacks as shown in previous example. On the back of the phone, remove the key located behind the hookswitch.
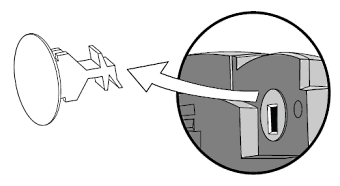
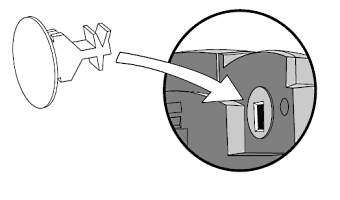
Step 2: reposition it so that the end tab (at 45º angle) is facing up. This will ensure that the handset remains in place within the cradle in this position.
Step 3: with mounting tab of the base unit facing up, fasten the base unit to wall using wall anchors (not included).

Step 4: snap the SoundPoint® IP 430 into place.
Polycom 430 – Place a Call
Using the Handset
To obtain dial tone, pick up the handset. Dial the desired number.
Using Hands-Free Speakerphone Mode.
With the handset on-hook, press any assigned line key, ![]() , or NewCall to obtain dial tone. Dial the desired number.
, or NewCall to obtain dial tone. Dial the desired number.
Using the Headset.
With the optional headset connected, press any assigned line key, ![]() , or NewCall to obtain dial tone. Dial the desired number.
, or NewCall to obtain dial tone. Dial the desired number.
You also have the option to dial directly from the dial pad without first getting dial tone. Simply enter the number then lift the handset, press the Dial soft key, or press ![]() or
or ![]() .
.
In all cases, the active call will appear on the display showing call duration and destination.
To obtain the IP address of your phone, press Menu followed by Status, Platform and Phone. The IP address is listed together with other phone information.
Polycom 430 Answer a Call
Using the Handset.
Pick up the handset.
Using Hands-Free Speakerphone Mode.
Press ![]() , or with the handset on hook press the line key with the active indicator, or the Answr soft key.
, or with the handset on hook press the line key with the active indicator, or the Answr soft key.
Using the Headset.
Press ![]() to answer the call through an optionally connected headset. Dial the desired number.
to answer the call through an optionally connected headset. Dial the desired number.
In all cases, the active call will appear on the display showing call duration and destination.
Incoming calls may be ignored by pressing the Reject soft key or invoking Do Not Disturb during ringing. Note that Do Not Disturb stays active when the call is dropped and will remain so until toggled off.
Polycom 430 End a Call
Press the EndCall soft key.
OR
Replace the handset
OR
press ![]() if in Hands-free Mode
if in Hands-free Mode
OR
press ![]() if in Headset Mode.
if in Headset Mode.
Polycom 430 Call Timer
Call duration on an active call is monitored through a local call timer. This is visible within the active call window on the display.
Polycom 430 Call Forwarding
To forward a call to another extension:
Press the Fwd soft key from the phone’s idle display or press Menu button and select Features and Forward at any time.
If multiple lines are in use:
- Select which line to forward.
- Enter a number or URL to forward all future calls to.
- Press the Enable soft key to confirm Call Forwarding.
If multiple lines are in use:
- Select which line to disable.
- Press the Disabl soft key.
Polycom 430 Transfer a Call
During a call, press the Trnsfr soft key (the active call is placed on hold). Dial the number to which you want to transfer the call.
OR
Use the arrow keys to access speed dial numbers, missed, placed, and received call lists. From one of these lists, press the Dial soft key. Press the Trnsfr soft key again to complete the transfer. This can be done as soon as the ringback sound is heard or you can wait until the third party answers and talk to them before completing the transfer.
Polycom 430 Conferencing
You can make a three way call using the conferencing feature.
- Place a call to the first party.
- Press the Cnfrnc soft key to create a new call (the active call is placed on hold).
- Dial the phone number of the second party or use the arrow keys to access speed dial numbers, missed, placed and received call lists.
- From one of these lists press the Dial soft key.
- When the second party answers, press the Cnfrnc soft key again to join all parties in the conference, or press the Split soft key to put the first call on hold and keep the second call as the active call.
- A conference may be created at any time between an active call and a call which is on hold (on the same line or another line) by pressing the Join soft key.
Splitting a Conference.
When a conference has been established, a Split soft key is available. Pressing this key will split the conference into two calls on hold.
Polycom 430 Redial
To dial the last call placed from your phone:
Press Redial button.
Press ![]() from the phone’s idle display, and press
from the phone’s idle display, and press ![]() again to place the call.
again to place the call.
OR
Press Menu button and select Features, Call Lists, Placed Calls to access the list.
Polycom 430 Voicemail
Received messages will be indicated by a flashing Message Waiting Indicator LED on the front of the phone and optionally a visual notification on the display. Individual line indicators reflect voice or text messages left on that line (useful if multiple lines are in use).
A stutter dial tone in place of normal dial tone is used to indicate that one or more voice messages are waiting at the message center.
To listen to voice messages:
Press Messages button and select Message Center.
Optional – If multiple lines are in use, select from which line messages are to be retrieved.
Display indicates number of messages and their importance. Press Connct to initiate Voicemail retrieval from the Message Center.
OR
Press Clear to turn off the flashing LED without listening to messages. Follow voice prompts to listen to messages.
Polycom 430 Contact Directory
In addition to a directory of missed, placed, or received calls, the phone can store a local directory of 500 or more contacts.
Limit depends on server configuration. Contact your system administrator for full details.
You can add, delete, edit, dial, or search for any contact in this list through just a few key strokes.
To add or edit a contact:
- Press Menu button and select Features, Contact Directory.
- Press More and then Add to enter another contact into the phone’s database or highlight an existing entry then press Edit.
- Enter first and/or last name from the keypad.
- Press the 1/A/a soft key to select between numeric and upper/ lower case alphanumeric modes.
- Press More and then Encode to access special characters in other languages if necessary.
- Enter the Contact number. This is a required field and it must be unique (not already in the directory). The Speed Dial Index will automatically be assigned the next available index value.
- Ring Type and Divert Contact may be left blank.
- Use
 and to switch between Enabled and Disabled settings for the last four fields.
 - Press Save to confirm or Cancel to abandon the changes then press Menu button or the Exit soft keys to return to the idle display.
Contacts can be easily added from Call Lists. See Call Lists for more information.
- Press More and then Search from the Contact Directory menu.
- Using the dial pad, enter the first few characters for First or Last names.
- Press Search to search for contacts.
- Successful matches can be dialed from the resulting screen.
Polycom 430 Call Lists
A local list of calls missed, received, and placed is maintained by the phone (up to 100 for each).
Press Menu button followed by Features, Call Lists and Missed, Received, or Placed Calls as desired. Call information will be displayed.
From this screen:
- Choose Edit to amend the dial string before dialing.
- Choose Dial to return the call.
- Choose Exit to return to the previous menu.
For additional choices, press More followed by:
- Info to view information about the call.
- Save to store the contact to the Contact Directory.
- Clear to delete the call from the list.
- Exit soft keys to return to the idle display.
Polycom 430 Buddy Lists and Block Contacts
Presence / Status / Buddy Lists
The phone combines interactive message services and status monitoring to complement a traditional messaging application such as email. Live interaction within a pool of phones is possible by monitoring the “presence” of the parties involved.
Each phone can “watch” the status of up to eight other phones. These other phones form the “Buddy List”. The status of buddies is displayed and updated in real time. Each phone can also be “watched” by up to eight other phones.
To add or delete a contact from your buddy list, or block a contact:
- Press Menu button and select Features, Contact Directory.
- Using the arrow keys, scroll through the directory to choose a contact.
- Press Edit and scroll down to the Watch Buddy or Block Buddy fields.
- Press to switch between Enabled or Disabled status.
- Press the Save soft key or Cancel to abandon the change then press Menu button to return to the idle display.
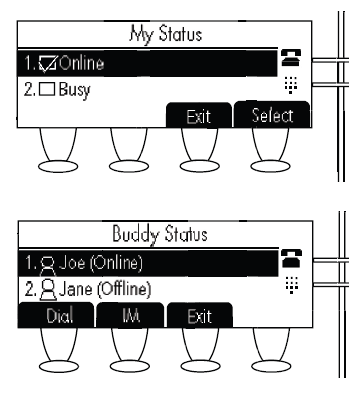
These figures show a typical My Status display and a Buddy Status screen display of monitored phones.
To Change Your Presence settings:
- Press Menu button and select Features and Presence.
- Choose My Status to change your own status (online, busy, etc.). This affects information sent to watching phones. Presence information will also be sent to watching phones when the user goes off-hook or invokes Do Not Disturb.
- The My Status display can also be accessed by pressing the Stats soft key from the idle display.
To View Status of the Contacts Within Your Buddy List:
- Press Menu button and select Features and Presence.
- Choose Buddy Status.
- This can also be accessed by pressing the Buddies soft key on the idle display.
To See Which Phones are Currently Monitoring Your Status:
- Press Menu button and select Features and Presence.
- Choose Watcher List.
- Press the Block soft key to block a watcher.
Polycom 430 Speed Dial
Pre-assigned numbers can be associated with speed dial entries for rapid automated dialing. Speed Dial entries are consecutively placed next to assigned line keys on the phone. When a new entry is added to the Contact List, it is automatically assigned the next available speed dial index.
To change a Speed Dial key assignment:
- Press Menu button and select Features, Contact Directory.
- Highlight an existing directory entry and press Edit, or press and hold the line key which already has a speed dial number assigned to it. That contact in the directory will automatically be displayed.
- If a speed dial index already exists, delete it by pressing the key and then the << softkey.
- If desired, enter a new speed dial index.
- Press Save to confirm or Cancel to abandon the change then press Exit to return to the idle display.
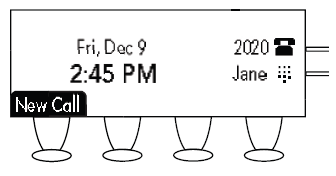
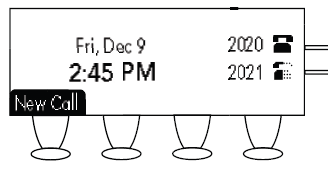
Idle display could now be as shown.
To dial a number assigned to a Line Key:
- Press the line key directly opposite the number on the display.
To quickly view a complete list of assigned speed dial entries:
- Press from the idle display.
- Dial directly from a selected number.
Polycom 430 Shared Lines
Shared lines are an optional feature configured on the server and may not be supported on your particular system. Contact your system administrator to find out.
A shared line is indicated by a different line icon. In the figure, the first line is private and the second line is shared. If two phones share a line, an incoming call to that number will cause both phones to ring. The call can be answered on either phone but not both.
If a shared line is in use on one of the phones, it may be unavailable on the other one. The shared line icon changes to a moving icon and the line LED turns red when the line is in use remotely.
Calls on shared lines can be transferred, put on hold, or added to a conference.
Polycom 430 Multiple Call Appearances
Each line on the phone can be configured to have one or more call appearances. More than one call appearance is useful if there is an active call and an incoming call arrives on the same line.
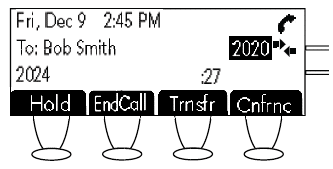
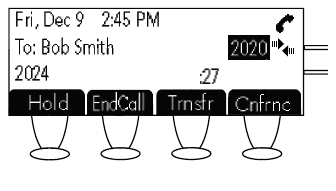
In the example shown, extension 2020 is in an outbound call with 2024.
This figure shows an incoming call from John Brown. To answer this incoming call, put the original call on Hold or press the [down] key to access the new call.
Soft key labels will be updated on the display with these options:
- Answr the incoming call.
- Reject the incoming call.
- Forward the incoming call to another extension.
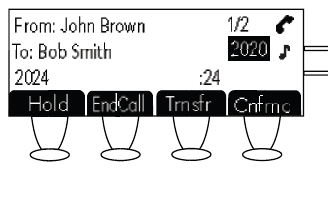
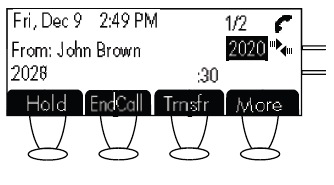
Answering the incoming call places the original call on Hold and refreshes the soft key labels as indicated (third figure). If more than one call appearance is in use, one will appear on the display and the total number will be indicated by a counter at the top right corner of the display.
For example “2/3” indicates that the highlighted call is the second one out of a total of three. In the example case illustrated, another outbound call can be placed on the same first line.
Press Hold during the first call. Then press NewCall to obtain dial tone and a new call appearance for a second call.
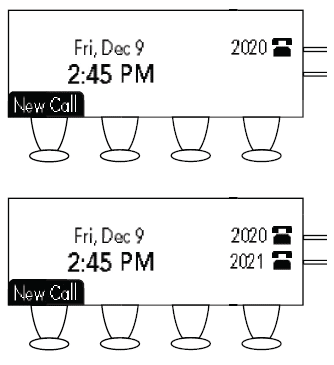
Polycom 430 Multiple Lines
Your SoundPoint 430 can support up to two lines. Lines can be configured for private or shared lines.
Typically, the top-most line key is reserved for the principle directory number of the phone. Depending on how your phone is configured, the display could resemble one of the displays shown.
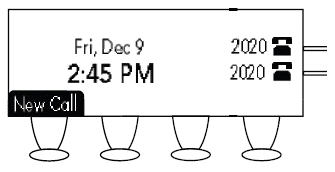
Polycom 430 Multiple Keys Per Line
A line on the phone can be configured to have both line keys associated with it. If this is the case, the display could look like this.
Incoming calls to this line will be distributed evenly among the two available keys. Similarly, outgoing calls will be distributed.
Polycom 430 Troubleshooting
This article provides possible solutions to problem with your Polycom SoundPoint 430 IP phone, such as No Dial-Tone, or your Polycom 430 phone is not ringing for incoming calls.
Polycom SoundPoint 430 IP Phone – No Dial-Tone
Verify power is correctly applied to the SoundPoint® IP 430 SIP phone:
- Check that the display is illuminated.
- Make sure the LAN cable is inserted properly at the rear of the phone (try unplugging and re-inserting the cable).
- If using inline powering, check that the switch is supplying power to the phone (contact your System Administrator).
Verify if dial tone is present on any other audio paths:
- Switch between handset, headset (if present) or hands-free to see if dial tone is present on these other paths.
- If dial tone exists on one of these, connect a different handset or headset to isolate the problem.
No Display, Incorrect Display, or Bad Contrast.
Verify power is correctly applied to the SoundPoint® IP 430 SIP phone:
- As “No Dial-Tone” above.
Verify contrast adjustment:
- Follow the instructions in this User Guide to readjust the contrast to a darker level.
- Reboot the phone to obtain a default level of contrast (follow the instructions in this User Guide).
Verify successful outbound or inbound calling:
- Place a call to the phone under investigation – check that the display indicates incoming call information.
- Lift the handset. Ensure dial tone is present and place a call to another extension or number, check that the display changes in response.
Polycom SoundPoint 430 IP Phone – No Ringing
Verify incoming ring setting and volume levels:
- Adjust the ringing level from the front panel using the volume up/down keys.
- Check that ring type selection is not Silent Ring.
Verify successful outbound or inbound calling:
- As “No Display” above.
- Check same status of handset, headset (if connected) and through the hands-free speakerphone.
Polycom SoundPoint 430 IP Phone – No Audio On Headset
Verify correct connections:
- Ensure the headset is plugged into the jack marked Headset at the rear of the phone.
- Ensure the headset amplifier (if present) is turned on and/or the volume is correctly adjusted.
- Ensure that headset is compatible with the phone.
No Response from Feature Key Presses.
Verify phone is in active state:
- Make a call to the phone to check for inbound call display and ringing as normal.
- If successful, try to press feature keys within the call to access Directory or Buddy Status for example.
- Press [MENU] followed by System Status and Server Status to confirm line is actively registered to the server.
- Reboot the phone to attempt re-registration to the server.
Polycom SoundPoint 430 IP Phone Display Shows “Network Link is Down”
Verify LAN cable is properly connected:
- Check termination at the switch or hub (furthest end of the cable from the phone).
- Check that the switch or hub is operational (flashing link/status lights) or contact your System Administrator.
- Press [MENU] followed by Status, Network and Ethernet. Scroll down to verify LAN port is Active.
Need high quality internet service to support your IP phones?
Fastmetrics provides a range of managed and reliable internet service connections, to support and power your Polycom SoundPoint 430 or IP phones.
- Our team has more than two decades experience providing managed phone services to businesses of all sizes.
- All Fastmetrics phone lines are provisioned over our private cloud voice network, for superior levels of Quality of Service (QoS).
- Wide range of advanced business features included. No extra costs. Plus, seamless mobile presence via the free Fastmetrics Cloud Phone app.
- Your choice of the latest Polycom VVX 310 or Yealink T42G handsets for FREE, for every phone user at your company.
Polycom 430 Features
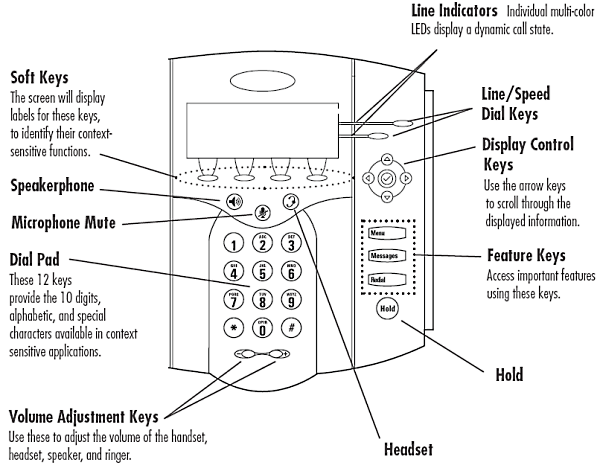
Polycom 430 Key Descriptions
| Feature Key | Description |
|---|---|
| Allows for hands-free communication during calls. | |
| Mutes audio transmission locally during calls. | |
| Allows you to place and receive calls through an optionally connected headset. |
|
 |
Line or Speed Dial keys with LED indicators. |
| Dials last connected party from the phone. | |
| Places current active call in Hold state. | |
| Access Message Center and Instant Messages. | |
| Access local and server features. | |
| Select control for options and text within local menus. | |
 |
Scrolling of lists and control of text/number entry on display. |
| Soft keys to select from various context-sensitive options. | |
| Volume keys to adjust audio and ringer volume. |
Polycom 430 General Key Use
Learn how to enter data and navigate through your phone’s menus.
Use ![]() and
and ![]() to scroll through lists. In some lists the
to scroll through lists. In some lists the ![]() and
and ![]() keys can be used as Page Up and Page Down.
keys can be used as Page Up and Page Down.
When menus have submenus, use ![]() and
and ![]() to move one level down or one level back up. Use Menu button to exit from any menu.
to move one level down or one level back up. Use Menu button to exit from any menu.
To enter text using the dial pad, press the number keys one or more times. For example, for ‘A’ press ‘2’ and for ‘C’ press ‘222’. When in text entry mode the display title will show whether keys will generate numbers (1), upper-case (A) or lower-case (a) characters and the 1/A/a soft key can change this.
Polycom 430 Headset Memory Mode
As an option, the headset can be permanently enabled. This is especially useful for regular headset users.
To do this:
- Press Menu button.
- Select Settings followed by Basic, Preferences, Headset Memory.
- Use the up or down arrows and Select soft key to enable Headset Memory Mode.
- Press Menu button to return to the main menu.
Subsequent calls to or from this phone using the headset will cause the headset key to flash. Pressing the line keys or the Answr soft key to receive a call will now connect to the user’s headset automatically.
Repeat steps 1-3 and select Disabled to turn Headset Memory Mode off.
Polycom 430 Microphone Mute
Turn your phone’s microphone off so the other party cannot hear you, or turn the microphone back on.
During a call, press ![]() . The LED on the phone lights up and a flashing microphone on the display indicates that the other party (parties) cannot hear you.
. The LED on the phone lights up and a flashing microphone on the display indicates that the other party (parties) cannot hear you.
Microphone Mute applies to all modes: handset, headset, and hands-free. You can still hear all other parties while Mute is enabled.
To turn off Microphone Mute, press ![]() again.
again.
Polycom 430 Do Not Disturb
To prevent the phone from ringing on incoming calls:
- Press Menu button and select Features, Do Not Disturb.
- A flashing icon and text on the display indicates that Do Not Disturb is on.
Calls received while Do Not Disturb is enabled are logged in the Missed Calls list.
To turn off Do Not Disturb:
- Press Menu button and select Features, and then deselect Do Not Disturb.
If multiple lines are in use:
- Do Not Disturb can be set on a line-by-line basis.
- Contact your system administrator for further details.
- When Do Not Disturb is enabled for a particular line, this is indicated by a flashing X beside the line indicator on the display.
Polycom 430 Volume Adjustment
Press the volume keys to adjust handset, headset, and hands-free speaker volume during a call. Pressing these keys in idle state adjusts the ringer volume.
![]()
Polycom 430 Time and Date
Time and Date is clearly displayed on the SoundPoint® IP 430 SIP phone.
If the phone cannot obtain a time and date from the server, the display will flash. Contact your system administrator if either time or date is incorrect. You have control over the format of the display and can turn it off.
Select options which are right for you as follows:
- Press Menu.
- Select Settings followed by Basic, Preferences, Time & Date.
- Select from Clock Date, Clock Time, Clock Order or Enable/Disable.
- Scroll through the options via the up and down arrow keys.
- Press Select to confirm and Menu to return directly to the idle display.
Polycom 430 Display Contrast
To adjust the contrast on the display to a comfortable level:
- Press Menu button.
- Select Settings followed by Basic, Contrast.
- Pressing the or soft keys or volume keys will increase or decrease the display contrast.
- Press the Ok or Cancel soft keys to accept or reject changes.
- Press Menu button or the Exit soft key to return to the idle display.
Polycom SoundPoint 430 – Ring Type
Many ring types are available including a Silent Ring. You can select different rings to distinguish between lines or to have a different ring from your neighbor’s phone.
To change the incoming ring:
- Press Menu button.
- Select Settings followed by Basic, Ring Type.
Optional – If multiple lines are used, first select which line to change. - Using the arrow keys, highlight the desired ring type.
- Press the Play soft key to hear the selected ring type.
- Press Select to change to the selected ring type.
- Press Menu button or the Exit soft key to return to the idle display.
If Silent Ring is selected, incoming calls can only be answered by pressing the Answer soft key. See also Distinctive Ringing / Call Treatment.
Polycom 430 Distinctive Ringing
You can set distinctive incoming ringing tones for contacts in your local directory. This allows identification of a contact by a specific ring tone.
To set a distinctive ring for a local contact:
- Press Menu button then Features, and select Contact Directory.
- Using the arrow keys, scroll through the directory to choose a contact.
- Press Edit and scroll down to Ring Type.
- Enter a number corresponding to one of the ring types available (press and then << to remove an existing value). See Ring Type in this guide for further details.
- Press the Save soft key or Cancel to abandon the change then press Menu button to return to the idle display.
- Incoming calls from this contact will now have a distinctive ringing pattern.
This feature is local to the phone, and may be overridden by server settings. Contact your system administrator for more details.
Polycom 430 Multilingual Support
Many languages are supported by the phone.
To change language:
- Press Menu button and select Settings, Basic, Preferences, Language.
- Scroll through the list of available languages and press the Select soft key when the desired language is highlighted.
- The display will change to the language of your choice.
- Exit to the idle display by pressing Menu button.

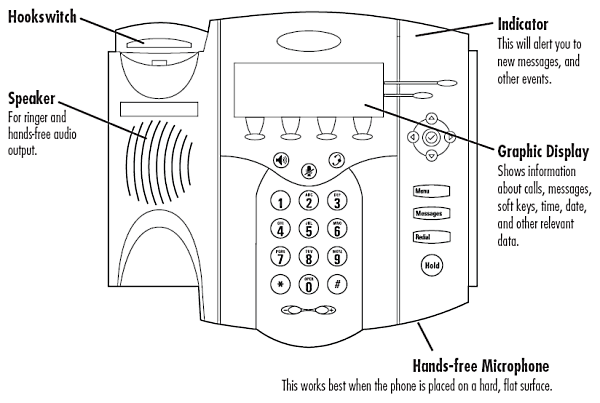
Video: Polycom SoundPoint IP 430
Video transcript: The Polycom SoundPoint IP 430 is an IP telephone that supports SIP protocol. It provides an easy transition from traditional PBX features and functionality into the world of Voice over IP.
The SoundPoint IP 430 is commonly used on SIP platforms such as asterisk, SIP-based IP PBXs and hosted IP PBXs. You can configure up to two lines with individual status display.
This telephone is easy to use with dedicated feature keys and context-sensitive soft keys. It also includes an easy-to-read graphical LCD display.
Fixed feature keys on this telephone include two line keys, a menu key, a messages key, a redial key, a hold key, speakerphone, mute and headset keys.
The SoundPoint IP 430 has a built-in, full-duplex speakerphone that uses Polycom’s legendary Acoustic Clarity Technology. It can be powered by standardized power over Ethernet or by using an external AC adaptor.
More Polycom Phone User Guides
Need information on another type of Polycom handset? Check out further user guides here;
- Polycom VVX 400/410 User Guide
- Polycom SoundPoint IP 650 User Guide
- Polycom SoundPoint IP 335 User Guide
- Polycom SoundStation 6000 Connect Network and Power
Fastmetrics is currently offering unlimited Polycom VVX 310 or Yealink T42G IP business phones for all new voice customers.
.
About Fastmetrics, Inc. Building & Business ISP
Since 2002, Fastmetrics is the Bay Area's only dedicated business ISP. We provide telecommunication services in California and the San Francisco Bay Area. Reliable service - backed by better live and local support. From install to 24-7 proactive monitoring, get treated like a VIP customer. Not a number by a faceless call center. We specialize in managed business internet and phones, dedicated high speed business fiber internet, business WiFi, SIP voice solutions / UCaaS and managed network services. We are a Microsoft and Cisco Meraki Partner. Our team are Certified Cisco Specialists, Ubiquiti Enterprise Wireless Accredited and Polycom Authorized Solution Advisors. We take care of your business network, so you can focus on growth.