Polycom SoundPoint 650 IP Phone User Guide & Support Manual
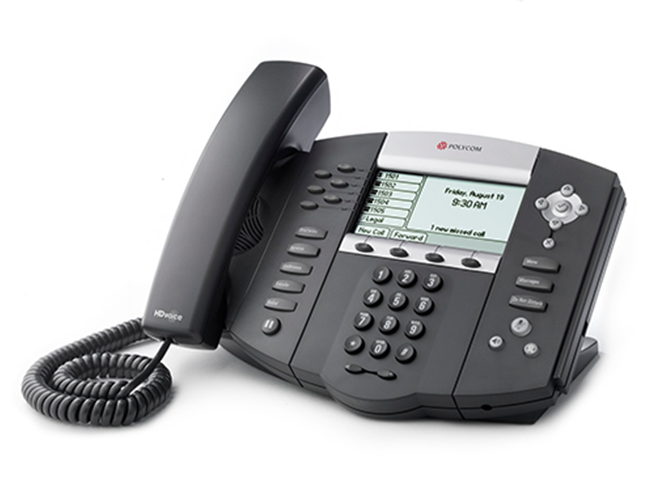
Thank you for choosing the Polycom SoundPoint IP 650 business phone. The Polycom 650 is a full-duplex, hands-free phone. The Polycom SoundPoint 650 phone provides business telephony features and functions such as multiple call appearance, call hold, transfer, and conferencing over an IP network. Fastmetrics is a Polycom Authorized Solution Advisor. We help businesses and users manage cloud phone service features with your Polycom IP 650 phones.
In this Polycom 650 user guide, find everything you need to quickly use your new Polycom phone. Before getting started, be sure to verify with your System Administrator that your network is prepared for configuring your Polycom IP 650 phone. Check your IP address info with our IP Address lookup tool.
Polycom 650 Phone Setup
- Polycom 650 Parts List
- Polycom 650 Connect Network & Power
- Polycom 650 Connect Handset and Headset
- Polycom 650 Attaching the Base
Polycom 650 Phone Layout and Keys
Polycom 650 Phone Settings
Polycom 650 Parts List
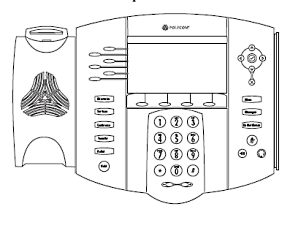
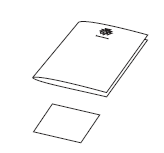
The following items are included in your SoundPoint IP 650 SIP package. Check this list before installation to ensure that you have received each item. If you are missing any items, please contact your system administrator.
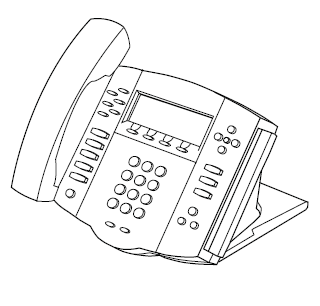
Polycom SoundPoint IP 650 SIP
Handset & Handset Cord

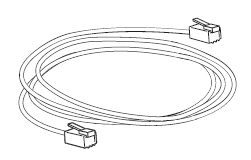
Network Cable
Power Adapter (specification varies according to country)
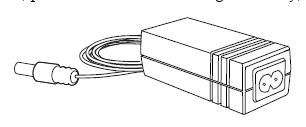
Note – the power adapter is not included in the Power over Ethernet (PoE) bundle package. Contact your system administrator if you require one.
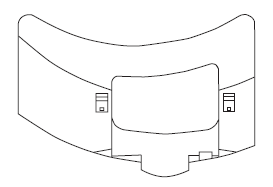
Phone Base
Quick Start Guide
Polycom 650 Connect Network & Power
You have two options for network and power source connections for your Polycom SoundPoint IP 650. Your System Administrator will advise you on which one to use.
You can use one of the following methods:
- AC power.
- Power over Ethernet (PoE).
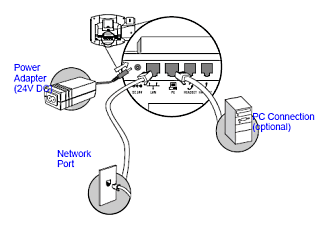
AC Power Option.
Connect the supplied network cable between the LAN jack on the phone and the LAN port on the wall or hub/switch device port. Connect the DC plug on the power adapter to the DC 24V jack marked on the phone. Connect the country-specific AC cord to the power adapter.
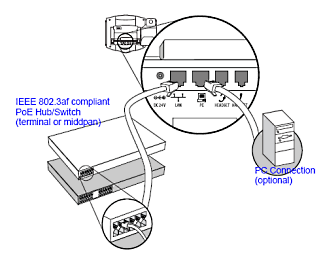
Power over Ethernet (PoE) Option.
Using a regular CAT5 cable (optional accessory from Polycom), the phone can be powered from a PoE (IEEE 802.3af) compliant switch or hub.
Need reliable internet service to support your IP phones?
Fastmetrics provides a range of managed, reliable internet service connections to support and power your Polycom SoundStation 650 or IP phones.
- Our team has more than two decades experience providing managed phone services to businesses of all sizes.
- All Fastmetrics phone lines are provisioned over our private cloud voice network, for superior levels of Quality of Service (QoS).
- Wide range of advanced business features included. No extra costs. Plus, seamless mobile presence via the free Fastmetrics Cloud Phone app.
- Your choice of the latest Polycom VVX 310 or Yealink T42G handsets for FREE, for every phone user at your company.
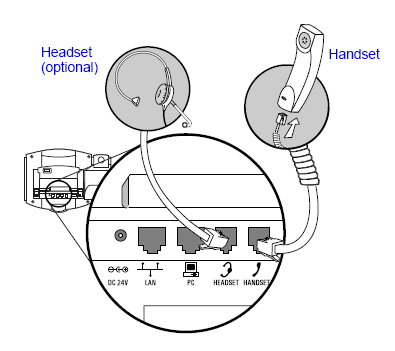
Polycom 650 Connect Handset and Headset
Connect the short straight end of the phone cord to the handset and the corresponding longer straight end of the cord to the handset jack on the back of the phone. Connect the headset (optional) to the headset jack on the back of the phone.
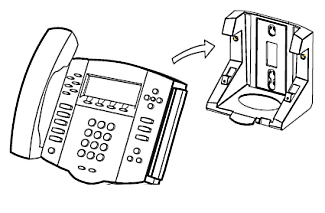
Polycom 650 Attaching the Base
The base unit can be attached to the SoundPoint IP 650 in one of two ways:
- Deskmount Method.
- Wallmount Method.
Deskmount Method
Step 1: place all cords in the recessed area above the modular jacks.
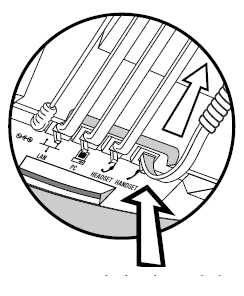
Step 2: align the two protrusions on the bracket with their corresponding holes in the phone.
Step 3: snap them together to lock the base to the phone.
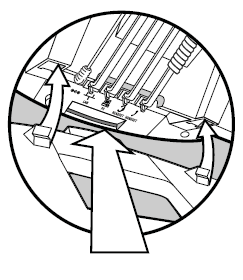
Wallmount Method
Step 1: place all cords in the recessed area above the modular jacks.
Step 2: on the back of the phone, remove the key located behind the hook switch and reposition it so that the end tab (at a 45 degree angle) is facing up.
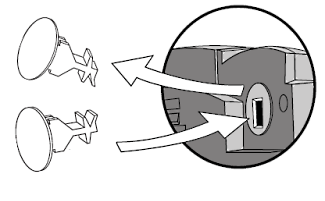
Step 3: with mounting tab of the base unit facing up, fasten the base unit to the wall mount using wall anchors (not included).
Note – The wall mount is not included in SoundPoint IP 650 SIP package. Contact your system administrator if you require one.
Polycom 650 Features
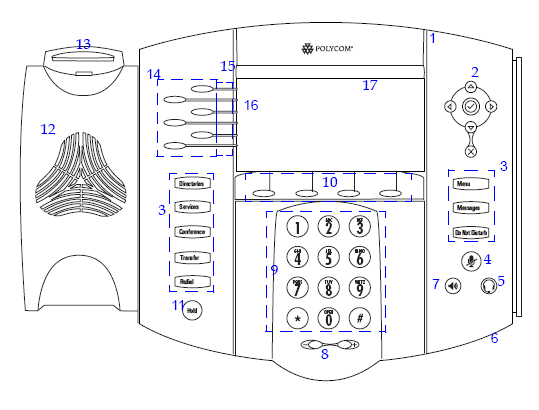
Features of the Polycom SoundPoint IP 650 SIP phone
| ID | Name | Description |
|---|---|---|
| 1 | Message Waiting Indicator | This will alert you to incoming calls, new messages, and other events. |
| 2 | Use the arrow keys to scroll and navigate through the displayed information. | |
| 2 | Use the select key to select the displayed information. | |
| 2 | Use the delete key to delete the displayed information. | |
| 3 | Directories | Access local directories and call lists. |
| 3 | Services | Access special services (contact system administrator). |
| 3 | Conference | Setup a local conference. |
| 3 | Transfer | Transfer current call to third party. |
| 3 | Redial | Dial most recently dialed party. |
| 3 | Menu | Access local (your phone) and global (your organization) features. |
| 3 | Messages | Receive text and voice messages. |
| 3 | Do Not Disturb | Cancels ringing and directs incoming calls to your Voice Mail (if supported). |
| 4 | Mutes audio transmission locally during calls. | |
| 5 | Allows you to place and receive calls through an optionally connected headset. | |
| 6 | Hands-free Microphone | Place your phone on a hard, flat surface for best results. |
| 7 | Allows for hands-free communication during calls. | |
| 8 | Use these to adjust the volume of the handset, headset, speaker, and ringer. | |
| 9 | Dial Pad | These 12 keys provide the 10 digits, the 26 alphabetic characters, and special characters available in context-sensitive applications. |
| 10 | Soft Keys | The screen will display labels for these keys, to identify their context-sensitive functions. |
| 11 | Hold | Holds an active call or resumes a held call. |
| 12 | Speaker | For ringer and hands-free audio output. |
| 13 | Hookswitch | |
| 14 | Line/speed Dial Key | Use these keys to activate up to six lines or speed dials that can be assigned to your phone. |
| 15 | Line Indicators | Individual multi-color LEDs display the dynamic call state and remote user status (busy lamp field (BLF) and presence). The mapping is:
|
| 16 | Use these keys to activate up to six lines or speed dials that can be assigned to your phone. The associated icons represent:
|
|
| 17 | Graphic Display | Shows information about calls, messages, soft keys, time, date, and other relevant data. Caller display information—first party, second party, number of calls.
Information display line (in order of precedence highest to lowest):
|
Polycom 650 Navigation Keys
To navigate through menus and to enter data, these are useful tips:
Use ![]() and
and ![]() arrows to scroll through the lists.
arrows to scroll through the lists.
Press the * key to page up. Press the # key to page down. These shortcuts can be used when lists scroll down beyond a single page.
When menus have submenus, use the ![]() and
and ![]() arrows to move one level down and one level up.
arrows to move one level down and one level up.
Press Menu to exit from any menu.
Press Directories to exit from any directory.
To enter text using the dial pad, press the number keys one or more times.
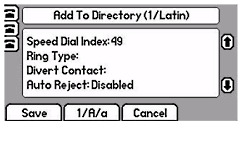
For example, for ‘A’ press ‘2’ and for ‘C’ press ‘222’. When in text entry mode, the title will show whether keys will generate numbers (1), upper-case (A), or lower-case (a) characters and the 1/A/a soft key can change this.
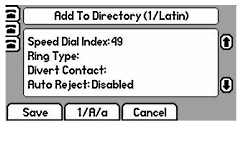
Polycom 650 Reject Calls
You can customize your Polycom SoundPoint 650 phone so that incoming calls from a particular party are immediately sent to your voice mail.
Note – Rejecting calls is not available on shared lines.
To send incoming calls from a particular contact directly to voice mail:
- Press Directories.
- Select Contact Directory.
- Use
 and keys to scroll through the list to find the contact that you wish to direct calls directly to your voice mail. You can also use the * key to Page Up and the # key to Page Down.
 - Press the Edit soft key and scroll down to Auto Reject.
- Use the and keys to select Enabled.
- Press the Save or Cancel soft keys to accept or cancel changes.
- Press Directories or the Exit soft key repeatedly to return to the idle display.
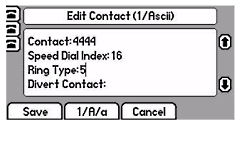
Polycom 650 Divert Calls
You can customize your Polycom SoundPoint 650 phone so that incoming calls from a particular party are transferred directly to a third party.
To divert incoming calls from a particular contact:
- Press Directories.
- Select Contact Directory.
- Use and keys to scroll through the list to find the contact that you wish to direct calls directly to your voice mail. You can also use the * key to Page Up and the # key to Page Down.
- Press the Edit soft key and scroll down to the Divert Contact field.
- Enter the number of the party to whom you want to divert incoming calls from this person.
- Scroll down to the Auto Divert field.
- Use the and keys to select Enabled.
- Press the Save or Cancel soft keys to accept or cancel changes.
- Press Directories or the Exit soft key repeatedly to return to the idle display.
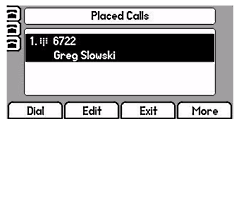
Polycom 650 Call Lists
Local lists of missed, received and placed calls are maintained by the Polycom SoundPoint 650 phone (up to 100 for each list).
Press Directories button followed by Call Lists, Missed Calls, Received Calls, or Placed Calls as desired.
To manage the listed calls:
- Select the Edit soft key to edit the dial string if necessary.
- Select the Dial soft key to return the call.
- Select the Exit soft key to return to the previous menu.
For additional choices, press the More soft key followed by:
- The Info soft key to view information about the call.
- The Save soft key to store the contact to the Contact Directory.
- The Clear soft key to delete the call from list.
Press the More and Exit soft keys repeatedly to return to the idle display.
Press ![]() from the idle display to access the Placed Calls list.
from the idle display to access the Placed Calls list.
Press ![]() from the idle display to access the Received Calls list.
from the idle display to access the Received Calls list.
Press ![]() from the idle display to access the Missed Calls list.
from the idle display to access the Missed Calls list.
These shortcuts can be used while placing calls or performing transferring and conferencing functions. You can manually clear the call lists. They are automatically cleared when you restart the phone.
Polycom 650 Troubleshooting
Polycom SoundPoint 650 Power and Startup
| Symptom | Problem | Corrective Action |
|---|---|---|
| There are power issues. | The SoundPoint IP 650 SIP phone has no power. | Do one of the following steps:
|
Polycom 650 Controls
| Symptom | Problem | Corrective Action |
|---|---|---|
| The dial pad does not work. | The dial pad on the SoundPoint IP 650 SIP phone does not respond. | Do one of the following steps:
|
Access to Screens and Systems
| Symptom | Problem | Corrective Action |
|---|---|---|
| There is no response from feature key presses. | The SoundPoint IP 650 SIP phone is not in active state. | Do one of the following steps:
|
| The display shows “Network Link is Down”. | The LAN cable is not properly connected. | Do one of the following steps:
|
Polycom 650 Calling
| Symptom | Problem | Corrective Action |
|---|---|---|
| There is no dial tone. | Power is not correctly applied to the SoundPoint IP 650 SIP phone. | Do one of the following steps:
|
| There is no dial tone. | Dial tone is not present on one of audio paths. | Do one of the following steps:
|
| The phone does not ring. | Ring setting or volume is low. | Do one of the following steps:
|
| The phone does not ring. | Outbound or inbound calling is unsuccessful. | Do one of the following steps:
|
Polycom 650 Displays
| Symptom | Problem | Corrective Action |
|---|---|---|
| There is no display. The display is incorrect. The display has bad contrast. | Power is not correctly applied to the SoundPoint IP 650 SIP phone. | Do one of the following steps:
|
| There is no display. The display is incorrect. The display has bad contrast. | The contrast needs adjustment. | Do one of the following steps:
|
| There is no display. The display is incorrect. The display has bad contrast. | Outbound or inbound calling is unsuccessful. | Do one of the following steps:
|
| The display is flickering. | Certain type of older fluorescent lighting causes the display to appear to flicker. | Do one of the following steps:
|
Polycom 650 Audio
| Symptom | Problem | Corrective Action |
|---|---|---|
| There is no audio on the headset. | The connections are not correct. | Do one of the following steps:
|
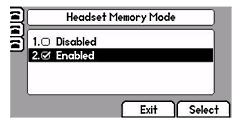
Polycom 650 Headset Memory Mode
As an option on your Polycom SoundPoint 650 phone, your headset can be permanently enabled. This is especially useful for regular headset users.
To do this:
- Press Menu button.
- Select Settings followed by Basic, Preferences, Headset Memory.
- Use the or arrows and Select soft key to enable Headset Memory Mode.
- Press Menu button to return to the main menu.
Repeat steps 1 to 4 to select Disabled and turn Headset Memory Mode off.
You can also activate Headset Memory Mode as follows:
- Press Headset button twice.
The flashing headset icon on the graphic display or a flashing headset key indicates that the headset mode is activated. - Pressing Line Key button or Answer soft key to receive a call will now connect to your headset automatically.
Polycom 650 Microphone Mute
During a call on your Polycom SoundPoint 650 phone, press the Mute button. The key lights up and a flashing microphone on the graphic display indicates that the other party (or parties) cannot hear you.
![]()
Microphone Mute applies to all modes: Handset, Headset, and Hands-free Speakerphone. You can still hear all other parties while mute is enabled.
To turn off Microphone Mute, press Mute button again.
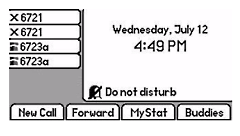
Polycom 650 Do Not Disturb
To prevent your Polycom 650 phone from ringing on incoming calls:
Press Do Not Disturb button to prevent the phone from ringing on incoming calls. A flashing icon and text on the graphic display indicates that Do Not Disturb is on. Calls received while Do Not Disturb is enabled are logged in the Missed Calls list unless configured to be forwarded to another party by your system administrator.
To disable Do Not Disturb, press Do Not Disturb button again.
Multiple Lines and Do Not Disturb
If multiple lines are configured on your phone, Do Not Disturb can be set on a line-by-line basis from the list using the ![]() and
and ![]() buttons.
buttons.
When Do Not Disturb is enabled for a particular line, this is indicated by a flashing “X” beside the line indicator on the display.
Note – The Do Not Disturb feature is local to the phone, and may be overridden by call server settings. For more information, contact your system administrator.
Polycom 650 Volume Adjustment
Press the Volume keys to adjust the handset, headset and hands-free speaker volume during a call on your Polycom SoundPoint 650 phone.
Pressing these keys in the idle state adjusts the ringer volume.
![]()
Note – To conform to regulatory requirements, handset and headset volume will return to a preset level after each call, but the configuration can be changed by your system administrator.
Hands-free Speakerphone volume settings will be maintained across calls.
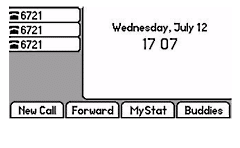
Polycom 650 Time and Date
The time and date appears on the graphic display of the Polycom SoundPoint IP 650 SIP phone.
If the phone cannot obtain a time and date from the call server, the display will flash. Contact your system administrator if either the time or date is incorrect.
You have control over the format of the time and date display and can turn the Polycom 650 display for time and date off.
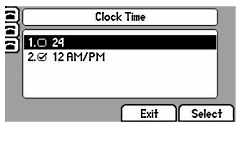
To configure the Time and Date:
- Press Menu.
- Select Settings followed by Basic, Preferences, Time & Date.
- Select from Clock Date, Clock Time, Clock Order, or Enable/Disable.
Scroll through the options under each of these selections using the ![]() and
and ![]() keys. Press the
keys. Press the ![]() soft key to confirm your choice. Press Menu or the Exit soft key repeatedly to return to the idle display.
soft key to confirm your choice. Press Menu or the Exit soft key repeatedly to return to the idle display.
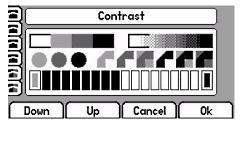
Polycom 650 Display Contrast
To adjust the contrast on the display of your Polycom 650 SoundPoint phone to a comfortable level:
- Press Menu.
- Select Settings followed by Basic, Contrast.
- Press the or soft keys to increase or decrease the display contrast. You can also use the volume keys to increase or decrease the diplay contrast.
- Press the Ok or Cancel soft keys to accept or cancel changes.
- Press Menu or the Exit soft key repeatedly to return to the idle display.
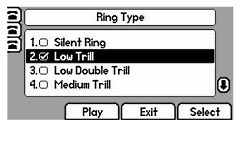
Polycom 650 Ring Type
You can select from various different ring types to distinguish between lines. Or, to have a different ring from your colleagues / neighbor’s on your Polycom SoundPoint 650 phone.
You can set distinctive incoming ringing tones for contacts in your local directory.
To change the incoming ring to a desired sound:
- Press Menu button.
- Select Settings followed by Basic, Ring Type.
Optional – If multiple lines are configured on your phone, first select the line to change from the list using the arrow keys. - Using the arrow keys, highlight the desired ring type.
- Press the Play soft key to hear the selected ring type.
- Press the Select soft key to change to the selected ring type.
- Press Menu button or the Exit soft key repeatedly to return to the idle display.
Polycom 650 Distinctive Ring
You can customize your Polycom SoundPoint 650 phone, so that you can distinguish different parties, via a distinctive ring type.
To set a distinctive ring type for a particular contact:
- Press Directories.
- Select Contact Directory.
- Use and keys to scroll through the list to find the contact you wish to specify a special ring type for. You can also use the * key to Page Up and the # key to Page Down.
- Press the Edit soft key and scroll down to the Ring Type.
- Enter the number corresponding to one of the ring types available.
Optional – To remove an existing value, press followed by key. - Press Directories or the Exit soft key repeatedly to return to the idle display.
Note – This feature is local to the phone, and may be over-ridden by your organization’s settings. For more information, contact your system administrator.
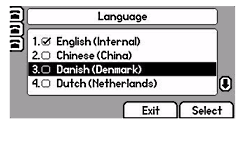
Polycom 650 Multilingual Support
Many languages are supported by the Polycom SoundPoint IP 650 SIP phone.
To change the language on your Polycom 650:
- Press Menu button.
- Select Settings, Basic, Preferences, Language.
- Scroll through the list of available languages and press the Select soft key when the desired language is highlighted. Text that appears on the graphic display will change to the language of your choice.
- Press Menu button or the Exit soft key repeatedly to return to the idle display.

More Polycom Phone User Guides
Need information on another type of Polycom handset? Check out further user guides here;
- Polycom VVX 400/410 User Guide
- Polycom SoundPoint IP 430 User Guide
- Polycom SoundPoint IP 335 User Guide
- Polycom SoundStation 6000 Connect Network and Power
Fastmetrics is currently offering unlimited Polycom VVX 310 or Yealink T42G IP business phones for all new voice customers.
Polycom SoundPoint IP 650 Manual: User Guide, Support Manual and FAQs for Faster Setup and Easier Use
How To Factory Reset Polycom SoundPoint IP 650 (SIP)
In some cases, such as giving the phone to another user, you may need to conduct a Polycom SoundPoint IP 650 factory reset or perform some other phone configuration to make the VoIP phone work and resume voice communications. To do this, follow these steps:
- Record your phone’s serial number. You’ll find it on the back of the phone.
- Unplug the Polycom SoundPoint IP 650 power supply and the Power Over Ethernet cable, and then plug it back in.
- Wait for the screen to appear that says Loading Application in the user interface. Press the key under Cancel.
- When you see a countdown, press the 4, 6, 8, and * keys simultaneously on the dial pad.
- When you get prompted for the Polycom Soundpoint IP 650 default password, enter the phone’s serial number you wrote down in step one. If you need to switch between numbers and letters, press the second key on the left.
- Press OK. The phone will now begin the reboot process and may flash a few times before reconnecting to the IP network.
How To Transfer Phone Calls to Another Phone With Polycom 650 Without Softkey Forward
Call forwarding is not a type of service available on shared or multiple lines. In that case, the Reject soft key is replaced with a Silence soft key, and the Forward soft key is absent as well. The Silence soft key will stop the ringing for that incoming call.
However, call forwarding is local to the phone, so it’s possible to override it in the Polycom 650 server settings. You’ll need to get in touch with your system administrator and ask them to enable call forwarding or perform a warm transfer.
How To Setup Speed Dial on Polycom 650
If you have numbers that you frequently dial, you can set up a speed dial on your phone for easy access by associating line keys with those contacts. Remember that every time you add a new contact to your Polycom 650, a speed dial is automatically assigned in consecutive order.
If you want to add a speed dial or edit a speed dial for an existing contact number, follow these steps:
- Press Directories and then select Contact Directory in the physical phone menus.
- Use the up and down arrows to scroll through the directory and find the contact for which you want to add or edit the speed dial.
- Enter the next available speed dial index if there is no speed dial assigned.
- If you want to assign a new speed dial index, first delete the existing one by pressing the left arrow and the Delete soft key, then enter a new speed dial index.
- You can also press and hold an unassigned line key to automatically assign a speed dial index.
- Press the Save or Cancel soft keys to accept or cancel changes.
- Press the Directories soft key or the Exit soft key repeatedly to return to idle mode.
To assign a completely new speed dial, follow these steps:
- Press and hold an unassigned line key. This will open a new empty entry in the Contact Directory.
- Press the More soft key and then the Add soft key.
- Enter the contact’s first and last name.
- Enter their phone number.
- Change the speed dial index.
- Press the Save soft key to accept the changes or Cancel to cancel them.
- Press the Exit soft key repeatedly to return to the idle display screen.
How To Page Down on Polycom SoundPoint IP 650 for Speed Dial
To page down, press the down arrow soft key on your phone. Alternatively, you can also use the # symbol to page down.
.
About Fastmetrics, Inc. Building & Business ISP
Since 2002, Fastmetrics is the Bay Area's only dedicated business ISP. We provide telecommunication services in California and the San Francisco Bay Area. Reliable service - backed by better live and local support. From install to 24-7 proactive monitoring, get treated like a VIP customer. Not a number by a faceless call center. We specialize in managed business internet and phones, dedicated high speed business fiber internet, business WiFi, SIP voice solutions / UCaaS and managed network services. We are a Microsoft and Cisco Meraki Partner. Our team are Certified Cisco Specialists, Ubiquiti Enterprise Wireless Accredited and Polycom Authorized Solution Advisors. We take care of your business network, so you can focus on growth.