Polycom SoundPoint IP 335 Phone Manual & User Guide
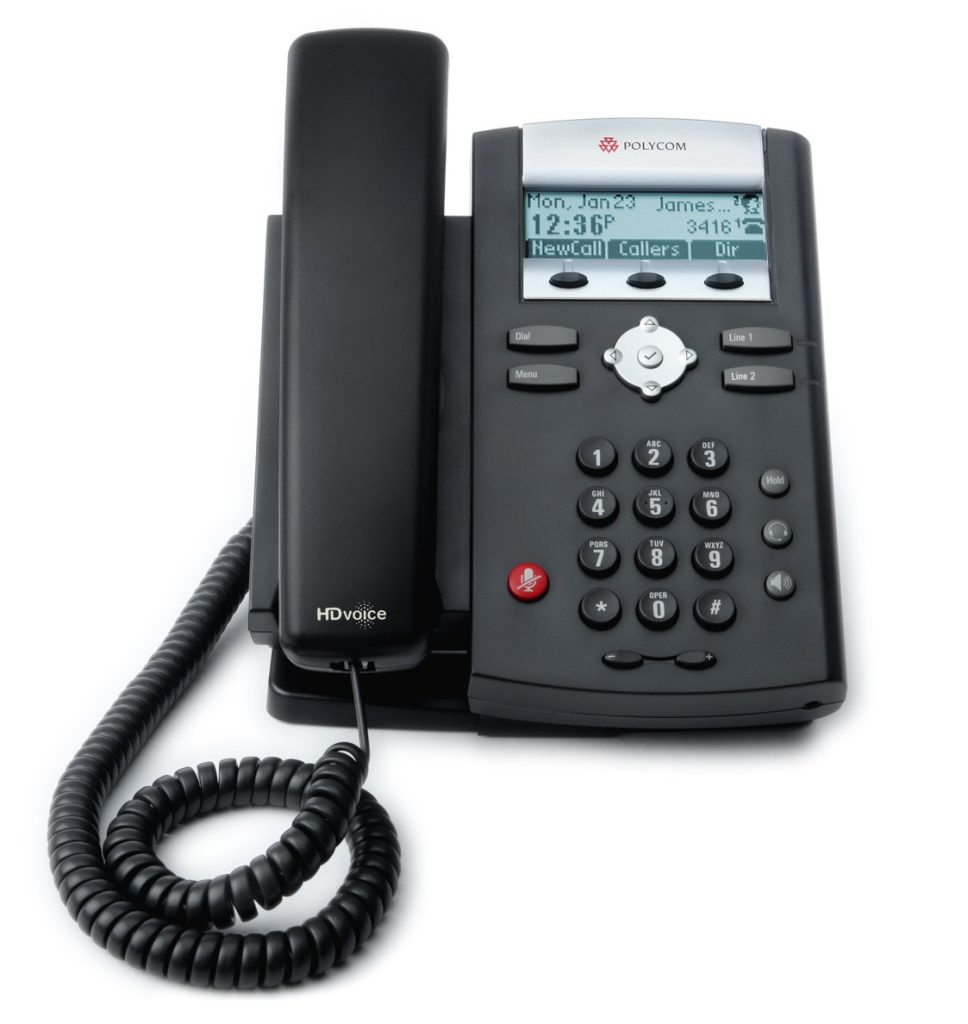
Thanks for choosing the Polycom SoundPoint IP 335 phone. The Polycom 335 is a full-duplex, hands-free phone. The SoundPoint IP 335 provides business telephony features and functions such as multiple call appearance, call hold, transfer, and conferencing over an IP network. Fastmetrics is a Polycom Authorized Solution Advisor. See how easy it is to manage cloud phone service features with your Polycom 335 phones.
In this Polycom 335 phone manual, you will find everything you need to quickly use your new phone. Before getting started, be sure to verify with your System Administrator (Sys Admin) that your network is prepared for configuring your Polycom IP 335 phone. You can find out your IP info here; What Is My IP Address.
Polycom 335 Phone Setup
- Polycom 335 Connect Network & Power
- Polycom 335 Connect Handset and Headset
- Polycom 335 Attaching the Base
- SoundPoint 335 Basics Video
Using Your Polycom 335
Polycom 335 Handling Calls
- Polycom 335 Place a Call
- Polycom 335 Answer a Call
- Polycom 335 End a Call
- Polycom 335 Redial
- Polycom 335 Place a Call on Hold
- Polycom 335 Reject Call
- Polycom 335 Divert Call
- Polycom 335 Transfer Call
Polycom 335 Contact List
Polycom 335 Phone Settings
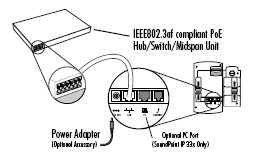
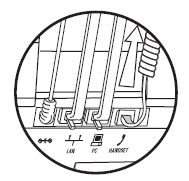
Polycom 335 Connect Network & Power
Use Power over Ethernet (PoE) for network and power source connections to connect your Polycom SoundPoint IP 335 phone, unless otherwise directed by your System Administrator.
The AC power adapter is a separate, optional accessory from Polycom. Your System Administrator will provide one if necessary.
Power over Ethernet (PoE)
Using a regular CAT5 cable (optional accessory from Polycom), the phone can be powered from a PoE (IEEE 802.3af) compliant switch or hub.
Connect Polycom 335 using a PoE source.
Plug the supplied network cable between the LAN jack on the phone and an available power and data port on the in-line power switch.
Need reliable internet service to support your IP phones?
Fastmetrics provides managed Internet options to support voice service over Polycom VVX or SoundPoint IP phones.
- Our team has more than two decades experience providing managed voice service to businesses.
- Fastmetrics voice is provisioned over our private network, for superior Quality of Service (QoS).
- Range of advanced business features included. No extra costs.
- Seamless presence via free apps and our browser based solution.
- Choice of free Polycom VVX or Yealink phones for all users.
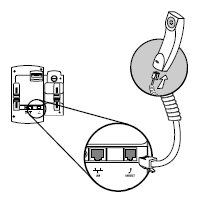
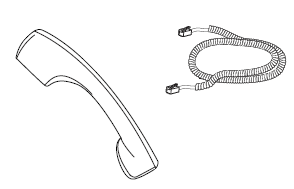
Polycom 335 Connect Handset and Headset
To Connect the Handset:
Connect the short straight end of the phone cord to the handset and the corresponding longer straight end of the cord to the handset jack on the back of the phone.
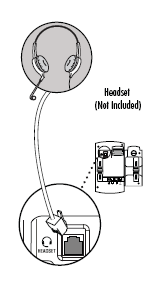
To Connect the Headset:
Connect the headset (optional) to the headset jack on the back of the phone.
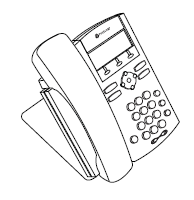
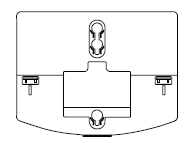
Polycom 335 Attaching the Base
The base unit can be attached to the SoundPoint IP 650 in one of two ways:
- Deskmount Method.
- Wallmount Method.
Deskmount Method
Step 1: place all cords in the recessed area above the modular jacks.
Step 2: align the two protrusions on the bracket with their corresponding holes in the phone.
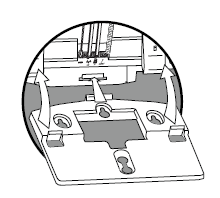
Step 3: snap them together to lock the base to the phone.
Wallmount Method
Step 1: place all cords in the recessed area above the modular jacks.
Step 2: on the back of the phone, remove the key located behind the hook switch and reposition it so that the end tab (at a 45 degree angle) is facing up.
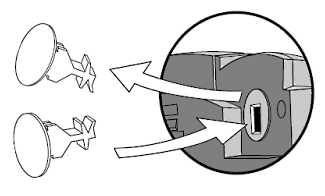
Step 3: with mounting tab of the base unit facing up, fasten the base unit to the wall mount using wall anchors (not included).
Note – The wall mount is not included in SoundPoint IP 650 SIP package. Contact your system administrator if you require one.

Polycom 335 Parts List
The following items are included in your SoundPoint® IP 335 SIP package. Check this list before installation to ensure that you have received each item. If you are missing any items, please contact your system administrator.
Polycom SoundPoint® IP 335 SIP
Handset & Handset Cord
Phone Base
Network / Power Cable

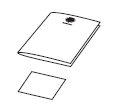
Quick Start Guide
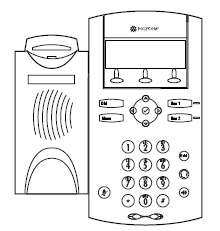
Polycom 335 Features

| ID | Name | Description |
|---|---|---|
| 1 | Message Waiting Indicator | This will alert you to incoming calls, new messages, and other events. |
| 2 | Do not disturb indicator. | |
| 2 | Unregistered line. | |
| 2 | VoiceMail/Messages. | |
| 2 | Ringing. | |
| 2 | Call Forward. | |
| 2 | Presence/BLF | |
| 2 | Registered line. | |
| 2 | Registered shared line. | |
| 3 | Softkeys | The screen will display labels for these keys, to identify their context-sensitive functions. |
| 4 | Line Indicators | Individual multi-color LEDs display the dynamic call state and remote user status (busy lamp field (BLF) and presence).
The mapping is:
|
| 5 | Activate up to two lines that can be assigned with your phone. | |
| 6 | Holds an active call or resumes a held call. | |
| 7 | Allows you to place and receive calls through an optionally connected headset. | |
| 8 | Allows for hands-free communication during calls. | |
| 9 | Hands-free Microphone | Place your phone on a hard, flat surface for best results. |
| 10 | Use these to adjust the volume of the handset, headset, speaker, and ringer. | |
| 10 | Soft Keys | The screen will display labels for these keys, to identify their context-sensitive functions. |
| 11 | Mutes audio transmission locally during calls. | |
| 12 | Dial Pad | These 12 keys provide the 10 digits, the 26 alphabetic characters, and special characters available in context-sensitive applications. |
| 13 | Access local (your phone) and global (your organization) features. | |
| 13 | Dials phone numbers or allows you to view the placed call list. | |
| 14 | Use the arrow keys to to scroll through the displayed information. | |
| 14 | Use the select key to select a field of displayed information or enter edit mode for some settings. | |
| 14 | Line/Speed Dial Key | Use these keys to activate up to six lines or speed dials that can be assigned to your phone. |
| 15 | Speaker | For ringer and hands-free audio output. |
| 16 | Hookswitch | |
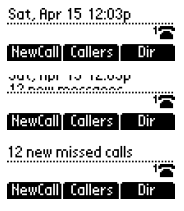
| 17 | Graphic Display | Shows information about calls, messages, soft keys, time, date, and other relevant data.
Important messages appear on the idle display through an animated scrolling list, which has precedence over the idle display. The following figures show a phone with four messages. The messages continuously scroll over the screen. Information display line (in order of precedence highest to lowest).
|
Polycom 335 Navigation Keys
To navigate through menus and to enter data, these are useful tips:
- Press Menu button to enter the basic settings menu or exit from any menu.
- Use
 and arrows to scroll through the lists.
 - Press the * key to page up. Press the # key to page down. These shortcuts can be used when lists scroll down beyond a single page.
- Use the dial pad keys to navigate through and make selections in numbered menu lists.
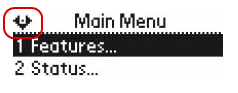
The navigation guide icon in the top left-hand corner of the graphic display shows which arrow keys can be used at a particular sublevel. For example, this figure shows that ![]() ,
, ![]() ,
, ![]() and
and ![]() can be used at this point.
can be used at this point.
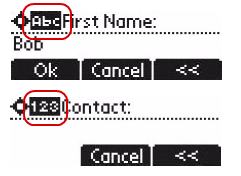
The type of text entry available is displayed in the title line. Switch between alphabetic (with and without an uppercase letter first) and numeric text entry by pressing the # key. Special characters like * and _ are considered alphabetic and appear when you press *, 1, or 0.
- Switch to uppercase by pressing .
- Switch to lower case by pressing .
Polycom 335 Voicemail
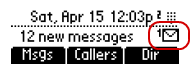
Your voice mail is saved in a centralized location and may be accessed from your phone. The presence of new Voice Mail messages is indicated by a flashing Message Waiting Indicator LED on the front of the phone and a visual notification on the graphic display.
If the phone is configured for multiple lines, an individual line indicator icon indicates Voice Mail messages left on that line.
A stutter dial tone in place of normal dial tone is used to indicate that one or more voice messages are waiting at the message center.SoundPoint 335
To listen to voice messages:
- Press Menu button.
- Select Features followed by Messages.
- Press to enter your voice mail.
- Follow voice prompts to retrieve your messages.
- If multiple lines are configured on your phone, select from which line messages are to be retrieved.
Polycom 335 Speed Dial
This article explains how to set up phone numbers with speed dial. Once you have entered phone numbers with speed dial, simply do the following to dial those speed dial numbers. To call a speed dial number, use the dial pad to enter the speed dial index followed by the # key, and then press Dial Buttonor pick up the handset to place a call.
Access the Speed Dial list by pressing Menu button, then select Features, Speed Dial, or press ![]() from the idle screen.
from the idle screen.
When a new entry is added to the Contact Directory, it is automatically assigned the next available speed dial index and the new entry appears at the bottom of the Speed Dial list.
To add or edit a speed dial index for an existing contact:
- Press the Dir soft key.
- Use and to scroll through the list to find the contact.
- Press the Edit soft key.
- Press repeatedly until the speed dial index appears.
- Press to select the speed dial index for edit.
Do one of the following steps:
- Enter the next available speed dial index.
- Delete the existing speed dial index by using the Backspace soft key, and then enter a new speed dial index.
- Press the Ok or Cancel soft keys to accept or cancel changes.
- Press repeatedly to return to the idle display.
- Press the Dir soft key.
- Use and to scroll through the list to find the contact.
- Press to select the entry.
- Press the Edit soft key.
- Press repeatedly until the speed dial index appears.
- Press to select the speed dial index for edit.
Do one of the following steps:
- Enter the next available speed dial index.
- Delete the existing speed dial index by using the Backspace soft key, and then enter a new speed dial index.
- Press the Ok or Cancel soft keys to accept or cancel changes.
- Press repeatedly to return to the idle display.

Polycom 335 Call History
A list of up to four current calls is maintained. You can scroll through this list using ![]() and
and ![]() . Calls are ordered using the following priorities: active, alerting, then held. Calls with the same priorities are ordered oldest first. If there are no current calls, this list is empty.
. Calls are ordered using the following priorities: active, alerting, then held. Calls with the same priorities are ordered oldest first. If there are no current calls, this list is empty.
Local lists of missed, received, and placed calls is maintained by the phone (up to 99 for each list). The initial view of both lists shows the list title and the first two calls in the list, where the first call is displayed in reverse video to indicate that it is currently selected. A symbol to indicate whether the call was answered ![]() or missed
or missed ![]() is shown for each entry in the incoming list.
is shown for each entry in the incoming list.
Press the Callers soft key to view the Received Calls list.

Press Dial to view the Placed Calls list.

To return the call:
- Press Dial to return the call.
To return to the previous menu:
- Press .
To store the contact to the local contact directory:
- Press to select the entry, then press the Save soft key.
Note – Press the Info soft key to see the call information. The name is displayed. Access the other information by using ![]() and
and ![]() .
.
To delete the call from list:
- Press the Delete soft key.
- Press repeatedly to return to the idle display.
- Press from the idle display to access Placed Calls list.
- Press from the idle display to access Received Calls list.
You can use these shortcuts while placing calls or performing transferring and conferencing functions. You can manually clear the call lists. They are automatically cleared when you restart the phone.
Polycom 335 Troubleshooting
Polycom SoundPoint IP 335 Power and Startup
| Symptom | Problem | Corrective Action |
|---|---|---|
| There are power issues. | The SoundPoint IP 335 SIP phone has no power. | Do one of the following steps:
|
Polycom SoundPoint IP 335 Controls
| Symptom | Problem | Corrective Action |
|---|---|---|
| The dial pad does not work. | The dial pad on the SoundPoint IP 335 SIP phone does not respond. | Do one of the following steps:
|
Access to Screens and Systems
| Symptom | Problem | Corrective Action |
|---|---|---|
| There is no response from feature key presses. | The SoundPoint IP 335 SIP phone is not in active state. | Do one of the following steps:
|
| The display shows “Network Link is Down”. | The LAN cable is not properly connected. | Do one of the following steps:
|
Polycom SoundPoint IP 335 Calling
| Symptom | Problem | Corrective Action |
|---|---|---|
| There is no dial tone. | Power is not correctly applied to the SoundPoint IP 335 SIP phone. | Do one of the following steps:
|
| There is no dial tone. | Dial tone is not present on one of audio paths. | Do one of the following steps:
|
| There is no dial tone. | The phone is not registered. | Contact your system administrator. |
| The phone does not ring. | Ring setting or volume is low. | Do one of the following steps:
|
| The phone does not ring. | You turned off the ringer. | Do one of the following steps:
|
| “Service Unavailable” appears on the graphic display. | The user pressed the New Call soft key, dialed a number with the handset on-hook, or attempted to make a call from the contact directory when the phone was not registered. | Check with your system administrator to see when your phone will be registered. |
| The line icon shows an unregistered line icon. | The phone is not registered. | Contact your system administrator. |
Polycom SoundPoint IP 335 Displays
| Symptom | Problem | Corrective Action |
|---|---|---|
| There is no display. The display is incorrect. The display has bad contrast. | Power is not correctly applied to the SoundPoint IP 335 SIP phone. | Do one of the following steps:
|
| There is no display. The display is incorrect. The display has bad contrast. | The contrast needs adjustment. | Do one of the following steps:
|
| There is no display. The display is incorrect. The display has bad contrast. | Outbound or inbound calling is unsuccessful. | Do one of the following steps:
|
| The display is flickering. | Certain type of older fluorescent lighting causes the display to appear to flicker. | Do one of the following steps:
|
Polycom SoundPoint IP 335 Audio
| Symptom | Problem | Corrective Action |
|---|---|---|
| There is no audio on the headset. | The connections are not correct. | Do one of the following steps:
|
Reliable internet service to support your IP phones
Fastmetrics provides managed Internet options to support voice service over Polycom VVX or SoundPoint IP phones.
- Our team has more than two decades experience providing managed voice service to businesses.
- Fastmetrics voice is provisioned over our private network, for superior Quality of Service (QoS).
- Range of advanced business features included. No extra costs.
- Seamless presence via free apps and our browser based solution.
- Choice of free Polycom VVX or Yealink phones for all users.
Polycom 335 Conferencing
You can create a conference with other parties using the phone’s local conference feature.
To set up a conference:
Call the first party.
Note – You can either dial the phone number directly or search for the number in the Contact Directory or Call Lists.
Press Conf soft key to create a new call. The active call is placed on hold.
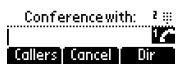
Call the second party. When the second party answers, press the Conf soft key again to join all parties in the conference.
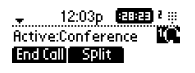
To split a conference call:
Press the Split soft key to split the conference. Both parties will be on hold.
To set up a conference call using the Join soft key:
When you are in an active call:
If you have one call on hold (on the same line or other line), use ![]() to go to the call on hold, then press the Join soft key.
to go to the call on hold, then press the Join soft key.
A conference is created with the active call, the call on hold and yourself. If you have more than one call on hold, use ![]() and
and ![]() to switch to the desired call on hold, press the Join soft key.
to switch to the desired call on hold, press the Join soft key.
A conference is created with active call, the call on hold and yourself.
To end a conference call:
Press the EndCall soft key or hang up. The other parties will continue to be connected.
Polycom 335 Manage Contacts
Your contacts are your personal phone directory. You can enter 99 contacts in your phone’s local contact directory. You can dial or search for a contact in this directory. You may be able to add, edit, and delete contacts. You may have access to portions of your corporate directory through your phone.
You can place calls to contacts in your corporate directory. You may be able to add contacts from the corporate directory to your local contact directory.
Polycom 335 Headset Memory Mode
This feature is especially useful for permanent or full-time headset users.
To permanently enable the Headset Memory Mode:
- Press Menu button.
- Select Settings > Basic > Preferences > Headset > Headset Memory.
- Use and to select Enabled.
- Press Key to confirm your choice.
- Press Menu button or repeatedly to return to the idle display.
- Repeat steps 1 to 4 to select Disabled and turn Headset Memory Mode off.
To activate Headset Memory Mode:
- Press Headset button twice.
- Pressing Line 1 or Answer soft key to receive a call will now connect to your headset automatically.

Polycom 335 Microphone Mute
During a call, press Mute button. The Message Waiting Indicator turns red and a microphone on the screen indicates that the other party (or parties) cannot hear you.
Microphone Mute applies to all modes: Handset, Headset, and Hands-free Speakerphone. You can still hear all other parties while mute is enabled.
![]()
To turn off Microphone Mute, press Mute button again.
Polycom 335 Do Not Disturb
To prevent the phone from ringing on incoming calls:
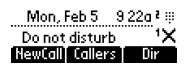
Press Menu button and then select Features > Do not disturb to prevent the phone from ringing on incoming calls. A flashing icon and text on the graphic display indicates that Do Not Disturb is on. Calls received while Do Not Disturb is enabled are logged in the Missed Calls list unless configured to be forwarded to another party by your system administrator.
To disable Do Not Disturb, press Menu button and then select Features > Do not disturb again.
Multiple Lines and Do Not Disturb.
If multiple lines are configured on your phone, Do Not Disturb can be set on a line-by-line basis from the list using ![]() and
and ![]() .
.
When Do Not Disturb is enabled for a particular line, this is indicated by a flashing X beside the line indicator on the display.
Note – The Do Not Disturb feature is local to the phone, and may be overridden by call server settings. For more information, contact your system administrator.
Polycom 335 Volume Adjustment
Press the volume keys to adjust handset, headset, and hands-free speaker volume during a call. Pressing these keys in idle state adjusts the ringer volume.
![]()
Note – To conform to regulatory requirements, handset and headset volume will return to a preset level after each call, but the configuration can be changed by your system administrator.
Hands-free Speakerphone volume settings will be maintained across calls.
Polycom 335 Time and Date
The time and date appears on the graphic display of the SoundPoint IP 335 SIP phone. If the phone cannot obtain a time and date from the call server, the display will flash. Contact your system administrator if either the time or date is incorrect.
You have control over the format of the time and date display and can turn the display of time and date off.

To configure the Time and Date:
- Press Menu button.
- Select Settings followed by Basic, Preferences, Time & Date.
- Select from Clock Date, Clock Time, Clock Order, or Enable/Disable.
- Scroll through the options under each of these selections using and .
- Press to confirm your choice.
- Press Menu button, or repeatedly to return to the idle display.

Polycom 335 Display Contrast
To adjust the contrast on the display to a comfortable level:
- Press Menu button.
- Select Settings followed by Basic, Contrast.
- Press the Up or Down soft keys to increase or decrease the display contrast.
- Press the Save soft key to accept changes or to cancel changes.
- Press Menu button, or repeatedly to return to the idle display.

Polycom 335 Ring Type
You can select from the different ring types to distinguish between lines or to have a different ring from your neighbor’s phone. You can set distinctive incoming ringing tones for contacts in your local directory.
To change the incoming ring to a desired sound:
- Press Menu button.
- Select Settings followed by Basic, Ring Type.
Optional – If multiple lines are configured on your phone, first select the line to change from the list using the arrow keys. - Using and , select the desired ring type.
- Press the Play soft key to hear the selected ring type.
- Press the Select soft key to change to the selected ring type.
- Press Menu button or repeatedly to return to the idle display.
If you configure your SoundPoint IP 335 phone for silent ring, press the Ringing Line key or the Answer soft key to answer the call. If your handset is off hook, the call is routed to the handset. If your handset is on hook, the call is routed to the speaker.

Polycom 335 Distinctive Ring
You can customize your phone so that you can distinguish different parties by ring type.
To set a distinctive ring type for a particular contact:
- Press the Dir soft key.
- Use and to scroll through the list to find the contact you wish to specify a special ring type for.
- Press to select the entry.
- Press the Edit soft key.
- Press repeatedly until the Ring Type field is displayed.
- Enter the number corresponding to one of the ring types available.
Optional – To remove an existing value, press. - Press the Ok or Cancel soft keys to accept or cancel changes.
- Press repeatedly to return to the idle display.
Note – This feature is local to the phone, and may be over-ridden by your organization’s settings. For more information, contact your system administrator.

Polycom 335 Multilingual Support
Many languages are supported by the SoundPoint IP 335 SIP phone.
To change the language:
- Press Menu button.
- Select Settings, Basic, Preferences, Language.
- Scroll through the list of available languages.
- Press to confirm your choice. Text that appears on the graphic display will change to the language of your choice.
- Press Menu button or the repeatedly to return to the idle display.

Polycom 335 Backlight Intensity
Backlight Intensity has three components:
- Backlight On.
- Backlight Idle.
- Maximum Intensity.
You can modify the Backlight On intensity and the Backlight Idle intensity separately. You can select high, medium, low, and off levels for both. When you modify the Maximum Intensity, you are modifying the entire backlight intensity scale.
For example, if you decrease the Maximum Intensity, the low, medium, and high values for both Backlight On intensity and the Backlight Idle intensity decrease.
The Backlight On intensity applies for the following events:
- Any key press.
- Hookswitch release.
- Incoming calls.
- Ending a call, holding a call, resuming a call by the other party.
- A voice or instant message received.
If you do not press any keys on the phone, after 20 seconds of the backlight turning on, the backlight dims (or changes) to medium in the following cases:
- A call is in progress.
- A call is on hold.
- There is an incoming call (ringing).
- There is an outgoing call (ringing back).
- Any menu shows on the display.
In all other cases, the Backlight Idle intensity applies.
To modify the backlight intensity, press Menu. Select Settings, then Basic, Backlight Intensity.

Select Backlight On Intensity.

Use Up and Down to select high, medium, low, or off, and then press the Select soft key. The default level is High. Select Backlight Idle Intensity.

Use Up and Down to select high, medium, low, or off. Press the Select soft key. The default level is low. Select Maximum Intensity.

Press the Up or Down soft keys to increase or decrease the backlight intensity. Press the Ok or Cancel soft keys to accept or cancel changes. Press Menu to return to the idle display.

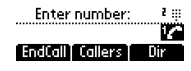
Polycom 335 Place a Call
You can place a call in many ways using your SoundPoint IP 335 phone:
- Using the handset.
- Using the speakerphone.
- Using the headset.
- Using Dial button.
- Using Line 1 or Line 2.
You can also dial the number first, and then choose the method you will use to speak to the other party. To call a speed dial number, use the dial pad to enter the speed dial index followed by the # key, and then press Dial or pick up the handset to place a call. You can search the local contact directory or the corporate directory and dial from the search results page.
During a call, you can alternate between Handset, Headset, or Hands-Free Speakerphone modes by pressing ![]() or
or ![]() , or picking up the handset.
, or picking up the handset.
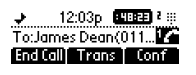
Call duration on an active call is monitored through a local call timer. This is visible within the active call window on the graphic display. In this figure, the call to James Dean has lasted 2 hours 48 minutes 23 seconds so far.

To place a call using the handset, do the following steps in any order:
- Pick up the handset.
- Dial the desired number using the dial pad.
To place a call using Hands-Free Speakerphone mode, do one of the following steps:
With the handset on-hook.
- Press Dial button.
- Press Line 1.
- Press or the NewCall soft key to obtain dial tone.
- Dial the desired number using the dial pad.
To place a call using the headset do one of the following steps:
With the optional headset connected.
- Press Dial button.
- Press Line 1, or the NewCall soft key to obtain dial tone.
- Press .
- You will hear a dial tone. Dial the desired number using the dial pad.
To place a call using the Dial key, do one of the following steps:
- Press the Callers soft key to view the Receive Call list.
- Press Dial button to view the Placed Call list.
- Use and to scroll through the list to find the contact.
- Press Dial to complete the call.
Polycom 335 Answer a Call
When you are not in another call, you can answer a call in three basic ways using your SoundPoint IP 335 phone:
- Using the handset.
- Using the speakerphone.
- Using the headset.
The steps for answering an incoming call when you are in another call are different if your phone is configured for:
A single Line Key per line.

Multiple Line Keys per line.

Incoming calls may be ignored by pressing the Reject soft key (for private lines) or the Ignore soft key (for private and shared lines). When your SoundPoint IP 335 phone is configured for Silent Ring, press the ringing Line key or the Answer soft key to answer the call. If your handset is off hook, the call is routed to the handset. If your handset is on hook, the call is routed to the speaker.
Answering When Not in Another Call:
In all cases, the active call will appear on the graphic display showing call duration and destination.
To answer a call using the handset:
Pick up the handset.
To answer a call using Hands-Free Speakerphone mode, do one of the following steps:
- Press .
- With the handset on-hook, press Line 1 opposite the incoming call (where the line status indicator is flashing green).
- Press the Answer soft key.
To answer a call using the headset:
- Press to answer the call through an optionally connected headset.
- If Headset Memory Mode is activated, press Line 1 or the Answer soft key.
Answering When in Another Call:
You are busy on an active call and a second incoming call arrives on the same phone number. If your phone is configured for a single Line Key per line, the second call may cause a call waiting tone to be played and you see the second call appearance. The call waiting prompt identifying the incoming caller appears for 10 seconds only. You can ignore, answer, or reject the call. (The Reject soft key on private lines only). After this point the active call is in focus and the user must scroll to the incoming call appearance to answer.
If your phone is configured for multiple Line Keys per line, the second call will cause a call waiting tone to be played, the second Line Key indicator to fast flash green, and an incoming call icon appears. The call waiting prompt identifying the incoming caller appears for 10 seconds only. You can ignore, answer, or reject the call. (The Reject soft key on private lines only.)
If your phone is configured for shared lines, the second call will cause a call waiting tone to be played, the second Line Key indicator to fast flash green, and an incoming call icon appears on the second Line Key. The call waiting prompt identifying the incoming caller appears for 10 seconds only.
Pressing the Ignore soft key will stop the ringing for that call.
To answer an incoming call on a line configured for a single Line Key:
- Press Hold button to place the original call on hold.
- Press to access the new call.
- Soft key labels are updated on the display showing Ignore, Answer, and Reject.
- Answer the incoming call.
- This places the original call on hold and refreshes the soft key labels.
To answer an incoming call on a line configured for multiple Line Keys, do one of the following:
Method 1:
Answer the call by pressing Line 1 or Line 2 associated with the second incoming call. The first call is put on hold and the second call is answered.
Method 2:
Press Hold button to place the original call on hold. Soft key labels are updated on the display showing Ignore, Answer, and Reject. Answer the incoming call. This places the original call on hold and refreshes the soft key labels.
Answering a call on shared lines is no different than on private line, except that there is no Reject soft key and another person on the shared line might answer the call.
Polycom 335 End a Call
To end a call, do one of the following steps:
- Press the End Call soft key.
- Replace the handset.
- Press if in Hands-free Speakerphone Mode, or if in Headset Mode.
Polycom 335 Redial
To redial a number using your SoundPoint IP 335 phone, press Dial twice.
Polycom 335 Place a Call on Hold
To place a call on hold during a call, press Hold button. This will be indicated on the graphic display by the hold icon as the line indicator.

Press Hold button again or the Resume soft key to resume the call. The active audio icon (either ![]() ,
, ![]() or
or ![]() , Headset, or Speaker) appears as the line indicator. When a call has been on hold for an extended period of time, both visual and audible alerts appear.
, Headset, or Speaker) appears as the line indicator. When a call has been on hold for an extended period of time, both visual and audible alerts appear.
When active on a call, the sound effects are played at a volume that is typically lower than the normal ringer volume.

Multiple Calls on Hold .
If multiple calls are on hold, use ![]() and
and ![]() to switch between the calls, then press the Resume soft key to retrieve the desired call.
to switch between the calls, then press the Resume soft key to retrieve the desired call.
If two or more calls are on hold, an indication appears on the graphic display, for example “3/4”, indicating that this is the third call out of four calls.
If calls are on hold on more than one Line Key, all calls are combined into a single call list. The Line Key that a call is associated with is indicated by the lineicon in reverse colors.
Pressing a Line Key with calls on hold will place the current active call on hold and resume the first call on that Line Key.
Polycom 335 Reject Call
You can customize your phone so that incoming calls from a particular party are immediately sent to your voice mail.
Note – Rejecting calls is not available on shared lines.
To send incoming calls from a particular contact directly to voice mail:
- Press the Dir soft key.
- Use and to scroll through the list to find the contact that you wish to direct calls directly to your voice mail.
- Press the Edit soft key.
- Press repeatedly until the Auto Reject field is displayed.
- Press , and then to change between Disabled and Enabled.
- Press the OK or Cancel soft keys to accept or cancel changes.
- Press repeatedly to return to the idle display.

Polycom 335 Divert Call
You can customize your phone so that incoming calls from a particular party are transferred directly to a third party.
To divert incoming calls from a particular contact:
- Press Dir soft key.
- Use and to scroll through the list to find the contact.
- Press to select the entry.
- Press the Edit soft key.
- Press repeatedly until the Divert Contact field is displayed.

- Press .
- Enter the number of the party to whom you want to divert the call.
- Press the Ok or Cancel soft keys to accept or cancel changes.
- Scroll down to the Auto Divert field.
- Press , and then to change between Disabled and Enabled.
- Press the Ok or Cancel soft keys to accept or cancel changes.
- Press repeatedly to return to the idle display.

Polycom 335 Transfer Call
There are three ways to transfer a call:
Method 1
Transfer the call, but first speak to the receiving party before completing the transfer. During a call, press Trans soft key. The active call is placed on hold. Enter the number to which you want to transfer the call.
As soon as the ring-back sound is heard or after the party answers, press Trans soft key to complete the transfer. You can talk privately to the party to which you are transferring the call before the transfer is completed. If you are using a handset, the transfer can be completed by putting the handset on the cradle.
You can cancel the transfer before the call connects by pressing the Cancel soft key. You transfer the call, and the party you have transferred the call to receives the call just like a normal call.
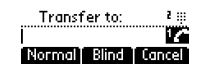
Method 2
Transfer the call to receiving party just as if the call was made directly to them. During a call, press the Trans soft key. Press the Blind soft key.
Do any one of the following steps:
- Enter the number to which you want to transfer the call.
- Press Dial to access the Placed Call list, use Up and Down to access the contact, and then press Dial.
- Press Dial to access the Placed Call list, use Up and Down to access the contact, and then press Select.
At this point, the call is connected to the number to which you are transferring the call.
Method 3
Conference, then exit. Establish a conference and Exit leaving the two other parties connected.
Polycom 335 Add a Contact
To add a contact:
Press the Dir soft key. Select your contact directory by pressing ![]() . Press
. Press ![]() . The Directory screen displays. New Entry displays at the top of the list.
. The Directory screen displays. New Entry displays at the top of the list.

Press ![]() to add a new entry.
to add a new entry.

Press ![]() to enter a first name.
to enter a first name.

Enter the first name of the contact from the dial pad.

Press the Ok or Cancel soft keys to accept or cancel changes. Press ![]() to display the next field in the contact’s entry. Repeat steps 4 to 8 to enter the last name of the contact. This is a required field and it must be unique (not already in the directory).
to display the next field in the contact’s entry. Repeat steps 4 to 8 to enter the last name of the contact. This is a required field and it must be unique (not already in the directory).

Repeat steps 4 to 8 to enter additional information for this contact, such as speed dial index, ring type, etc. Press ![]() to end contact’s data entry.
to end contact’s data entry.

Press the Yes or Cancel soft keys to accept or cancel changes. Press ![]() repeatedly to return to the idle display.
repeatedly to return to the idle display.

Add Contact From Call List:
- Press the Callers soft key to view the Received Calls list or press Dial button to view the Placed Calls list.
- Use and to scroll through the list to find the contact.
- Press to select the entry.
Optional – Press the Info soft key. The name is displayed. The number, time and date when the call started, and call duration can be viewed by pressing key.
Optional – Press ![]() repeatedly to select the phone number.
repeatedly to select the phone number.
- Press the Save soft key to save the contact in the local contact directory.
- Press repeatedly to return to the idle display.

Add Contacts From Corporate Directory:
- Press the Dir soft key.
- Press , then press to select the corporate directory.
- Search for the contact.
- Press . The contact’s information appears on the graphic display.
- Press the Save soft key to save the contact in the local contact directory. “Entry saved” appears on the graphic display. Only the first name, last name, and phone number are saved.
- If the contact already exists in the contact directory, “Entry already exists” appears.
- Press repeatedly to return to the idle display.

Polycom 335 Edit a Contact
To edit a contact:
Press the Dir soft key. Select your contact directory by pressing ![]() . Press
. Press ![]() and
and ![]() to scroll through the list to find the contact. Press
to scroll through the list to find the contact. Press ![]() to select the entry.
to select the entry.

Press the Edit soft key.

Use ![]() and
and ![]() to scroll through the fields, then press
to scroll through the fields, then press ![]() to select the field.
to select the field.

Make the desired changes.
The Ok soft key is not displayed until a change has been made. The Cancel soft key in this context will cancel the edit session for the entry and return to the screen before the Edit soft key was selected.
Press ![]() and
and ![]() to place the cursor either at the beginning or end of the item respectively. Press
to place the cursor either at the beginning or end of the item respectively. Press ![]() to move to the next field.
to move to the next field.
Press the Ok or Cancel soft keys to accept or cancel changes. Press ![]() repeatedly to return to the idle display.
repeatedly to return to the idle display.

Polycom 335 Delete a Contact
To delete a contact:
Press the Dir soft key. Select your contact directory by pressing ![]() . Press
. Press ![]() and
and ![]() to scroll through the list to find the contact. Press
to scroll through the list to find the contact. Press ![]() to select the entry.
to select the entry.

Press the Delete soft key. Press ![]() repeatedly to return to the idle display.
repeatedly to return to the idle display.
Polycom 335 Search for a Contact
To search for a contact in your personal directory:
- Press the Dir soft key.
- Select your contact directory by pressing .
- Search for a contact using the dial pad.
- The first time a dial pad key is pressed, the first entry whose last name starts with a character that matches the first letter on the key label will be retrieved.
- The second key press repeats the process using the second letter on the key and so on. For example, to find the first directory entry whose last name starts with J, press the 5 key once.
- To find the first entry whose last name starts with R, press the 7 key three times.

Search the corporate directory:
- Press the Dir soft key.
- Select your contact directory by pressing .

Search for the contact in one of the following ways:
- In the search line, enter the first few characters of the contacts’s last name using the dial pad. For example, to search for James Woller, enter wo in the search line, or press the Submit soft key. In this example, James Woller appears in the search results.
- Press the AdvFind soft key, enter search values in the displayed fields. For example, enter Smith as the last name.
- Press the Submit soft key. In this example, Bob Smith appears in the search results.
- You can dial any successful matches from the resulting information on the graphic display.

Polycom 335 Call a Contact
To call a contact from your directory:
- Press the Dir soft key.
- Select your contact directory by pressing .
- Press and to scroll through the list to find the contact.
- Press Dial button or lift the handset.
To call a contact from the corporate directory:
- Press the Dir soft key.
- Select Corporate Directory.
- Search for the contact.
- Press Dial button or lift the handset.
Polycom 335 Manage your Buddy Lists
Buddy Lists allow you to monitor the status and presence of up to 8 other lines. This is different than contacts – which allow you to make calls from a personal phone list.
The status of your buddies is displayed and updated in real time. Your phone canbe “watched” by up to 8 other phones.
To view and change your presence settings:
- Press Menu Button.
- Select Features, then Presence, My Status.
- Use and to scroll through the list.
- Press to select your new status.
This affects information sent to phones watching you. Presence information will also be sent to watching phones when you go off-hook or enable Do Not Disturb.

To add or delete a contact from your buddy list:
- Press the Dir soft key.
- Use and to scroll through the list to find the contact.
- Press to select the entry.
- Press repeatedly until the Watch Buddy field appears.
- Press to select the Watch Buddy field.
- Use and to switch between Enabled and Disabled settings.
- When Watch Buddy is enabled, the contact is added to your buddy list. When Watch Buddy is disabled, the contact is removed from your buddy list. The default for Watch Buddy is Disabled.
- Press the Ok or Cancel soft keys to accept or cancel changes.
To block or unblock a contact from your buddy list:
- Press the Dir soft key.
- Use and to scroll through the list to find the contact.
- Press to select the entry.
- Press repeatedly until the Block Buddy field appears.
- Press to select the Block Buddy field.
- Use and to switch between Enabled and Disabled settings.
- When Block Buddy is enabled, the contact cannot watch your phone. When Block Buddy is disabled, the contact can watch your phone. The default for Block Buddy is Disabled.
- Press the Ok or Cancel soft keys to accept or cancel changes.
- Press repeatedly to return to the idle display.

Video: Basics of using the Polycom SoundPoint IP 335
Below, a great video overview of the SoundPoint IP 335 phone from Broadcore. See all the basics of this Polycom business phone in action and how user friendly it is, with its soft keys and efficient basic functions in action. For further reference, a full transcript of the video is also provided.
Video transcript: Hi. My name is Dawn Goodnight with Broadcore and today we’re looking at the Polycom SoundPoint IP 335. I think you’re really going to like this phone. It’s a streamlined business phone. It’s going to take up a very small amount of space on your desk. You will see that it has three soft keys below the display. We’ve got the arrows centrally located and the dial button here on the left. So that will be a super important button for you.
So we’re going to go over the basic features – receiving a call, making a call, putting a call on hold, getting a second call. We will also do transfer, three-way calling, voicemail and then we will do a couple of features on the phone.
So the first thing is receiving a call. So when we get a call, it rings. We see it on the display and I simply pick up the handset to answer or if you’re going to use speakerphone or headset, you can just press the speakerphone or headset buttons. So if I want to make a call, the best way is to put in all my digits and then pick up the handset. I know we want to pick up the handset first. But sometimes we will put in some digits and then we will look up the number and then we come back and it doesn’t work so well. So what we want to do is we want to put in all the digits and then pick up the handset to make a call. So when we’re on a call and we want to put it on hold, we simply press the hold button. So when we come back to want to pick up that call on hold, we want to pick up the handset but we should press the resume button and then pick it up.
So the next feature is answering a second call. So my first call comes in. I’m talking to them and I see a second call on my display. I see my little icon is moving. I also hear a call waiting beep in my ear. So the best way to answer a second call is by pressing the down arrow key and then the answer soft key. So now I’ve got my call on top and then the call is on hold. So if I want to change back to my first call, I press the down arrow key and I press the resume button. Then when I’m finished, I can just press the end call button. So the call I’m active on is always going to be at the top.
So then the next feature is transfer. We want to talk about the three types of transfer and then we will do a three-way call. So transfer comes in the variety where I take a call and then I want to tell someone I’m going to transfer the call to them. So that’s what we call a “consulted transfer”. We’ve also got a blind transfer where a call comes in. We just want to send it direct and then we’ve got a “transfer to voicemail”. If someone is unavailable, we can send it direct to voicemail.
So let’s say I’m on the phone. To transfer the call, I simply press the transfer button. It puts my first call on hold. I get a dial tone. I enter the extension or phone number where I want to send the call. I press the dial button and then I wait for them to answer. Once they answer, I press the transfer button again and I hang up. So I’ve transferred the call successfully. So if I want to do a blind transfer, I’m on the phone. I press “Transfer”. Then I press “Blind”. Then I enter the extension or phone number and press “Dial” and the phone transfers the call. The third type of transfer is voicemail transfer. So when I’m on the phone, I press “More”. Then I press “Direct VM”. I enter the extension where I want to send the call and press “Enter”. This call goes into a voicemail and they’re there directly without having to ring on the phone.
So the last feature in this section is called “three-way calling”. So it’s listed as conference on this. So let’s say I’m on my first call. I press the “More” button and then I press “Conference”. It puts my first call on hold. I dial the number or extension, who I want to conference with. I press “Dial”. Once they answer and they agree to the conference, I press “Conference” again and we’re all three talking. So that is three-way calling.
The next feature is voicemail. Now voicemail is a really important feature. So when I have a message, I just press the “Messages” button. It’s a soft key. The very first time it will ask me to change my password and to record my name. So I will just follow the prompts. After that, I just press “Messages”.
Then a next feature I want to go over are just a couple of features on the phone. So here at the bottom of the display, we’ve got the plus and minus. So when the phone is idle, this is the ringer volume. When I’m on the phone, it’s the volume of the handset or if I were on speaker or headset, it would be the volume for those keys. Then I’ve got my missed calls alert. So what I do to clear that is I press the down arrow key. I can review my calls and then I can press the left arrow key to exit out of that menu.
Then the last option that I’m going to go over is the changing of the ringtones. So you just press “Menu,” three, one, four and then I can scroll through and I can listen to the ringtones. Then I find one that I really like and I press “Select”. Then I can just press “Menu” to exit. So that is a brief overview of the SoundPoint IP 335. I hope you enjoy it.
More Polycom Phone User Guides
Need information on another type of Polycom handset? Check out further user guides here;
- Polycom VVX 400/410 User Guide
- Polycom SoundPoint IP 430 User Guide
- Polycom SoundPoint IP 650 User Guide
- Polycom SoundStation 6000 Connect Network and Power
.
About Fastmetrics, Inc. Building & Business ISP
Since 2002, Fastmetrics is the Bay Area's only dedicated business ISP. We provide telecommunication services in California and the San Francisco Bay Area. Reliable service - backed by better live and local support. From install to 24-7 proactive monitoring, get treated like a VIP customer. Not a number by a faceless call center. We specialize in managed business internet and phones, dedicated high speed business fiber internet, business WiFi, SIP voice solutions / UCaaS and managed network services. We are a Microsoft and Cisco Meraki Partner. Our team are Certified Cisco Specialists, Ubiquiti Enterprise Wireless Accredited and Polycom Authorized Solution Advisors. We take care of your business network, so you can focus on growth.